 Real build
Other Builds
Our designDesigned by DIY Outdoor Builds and checked board by board in a 3D model built from real lumber sizes. We have not built this one yet, so measure as you go.
A classic nest box with a pointed roof, made of seven parts cut from one 1×6 board. The floor is 4 × 5½ in (10 × 14 cm), the entrance hole 1⅛ in (28 mm), and the back runs 3 in below the box so you can screw it to a post, a wall or a tree.
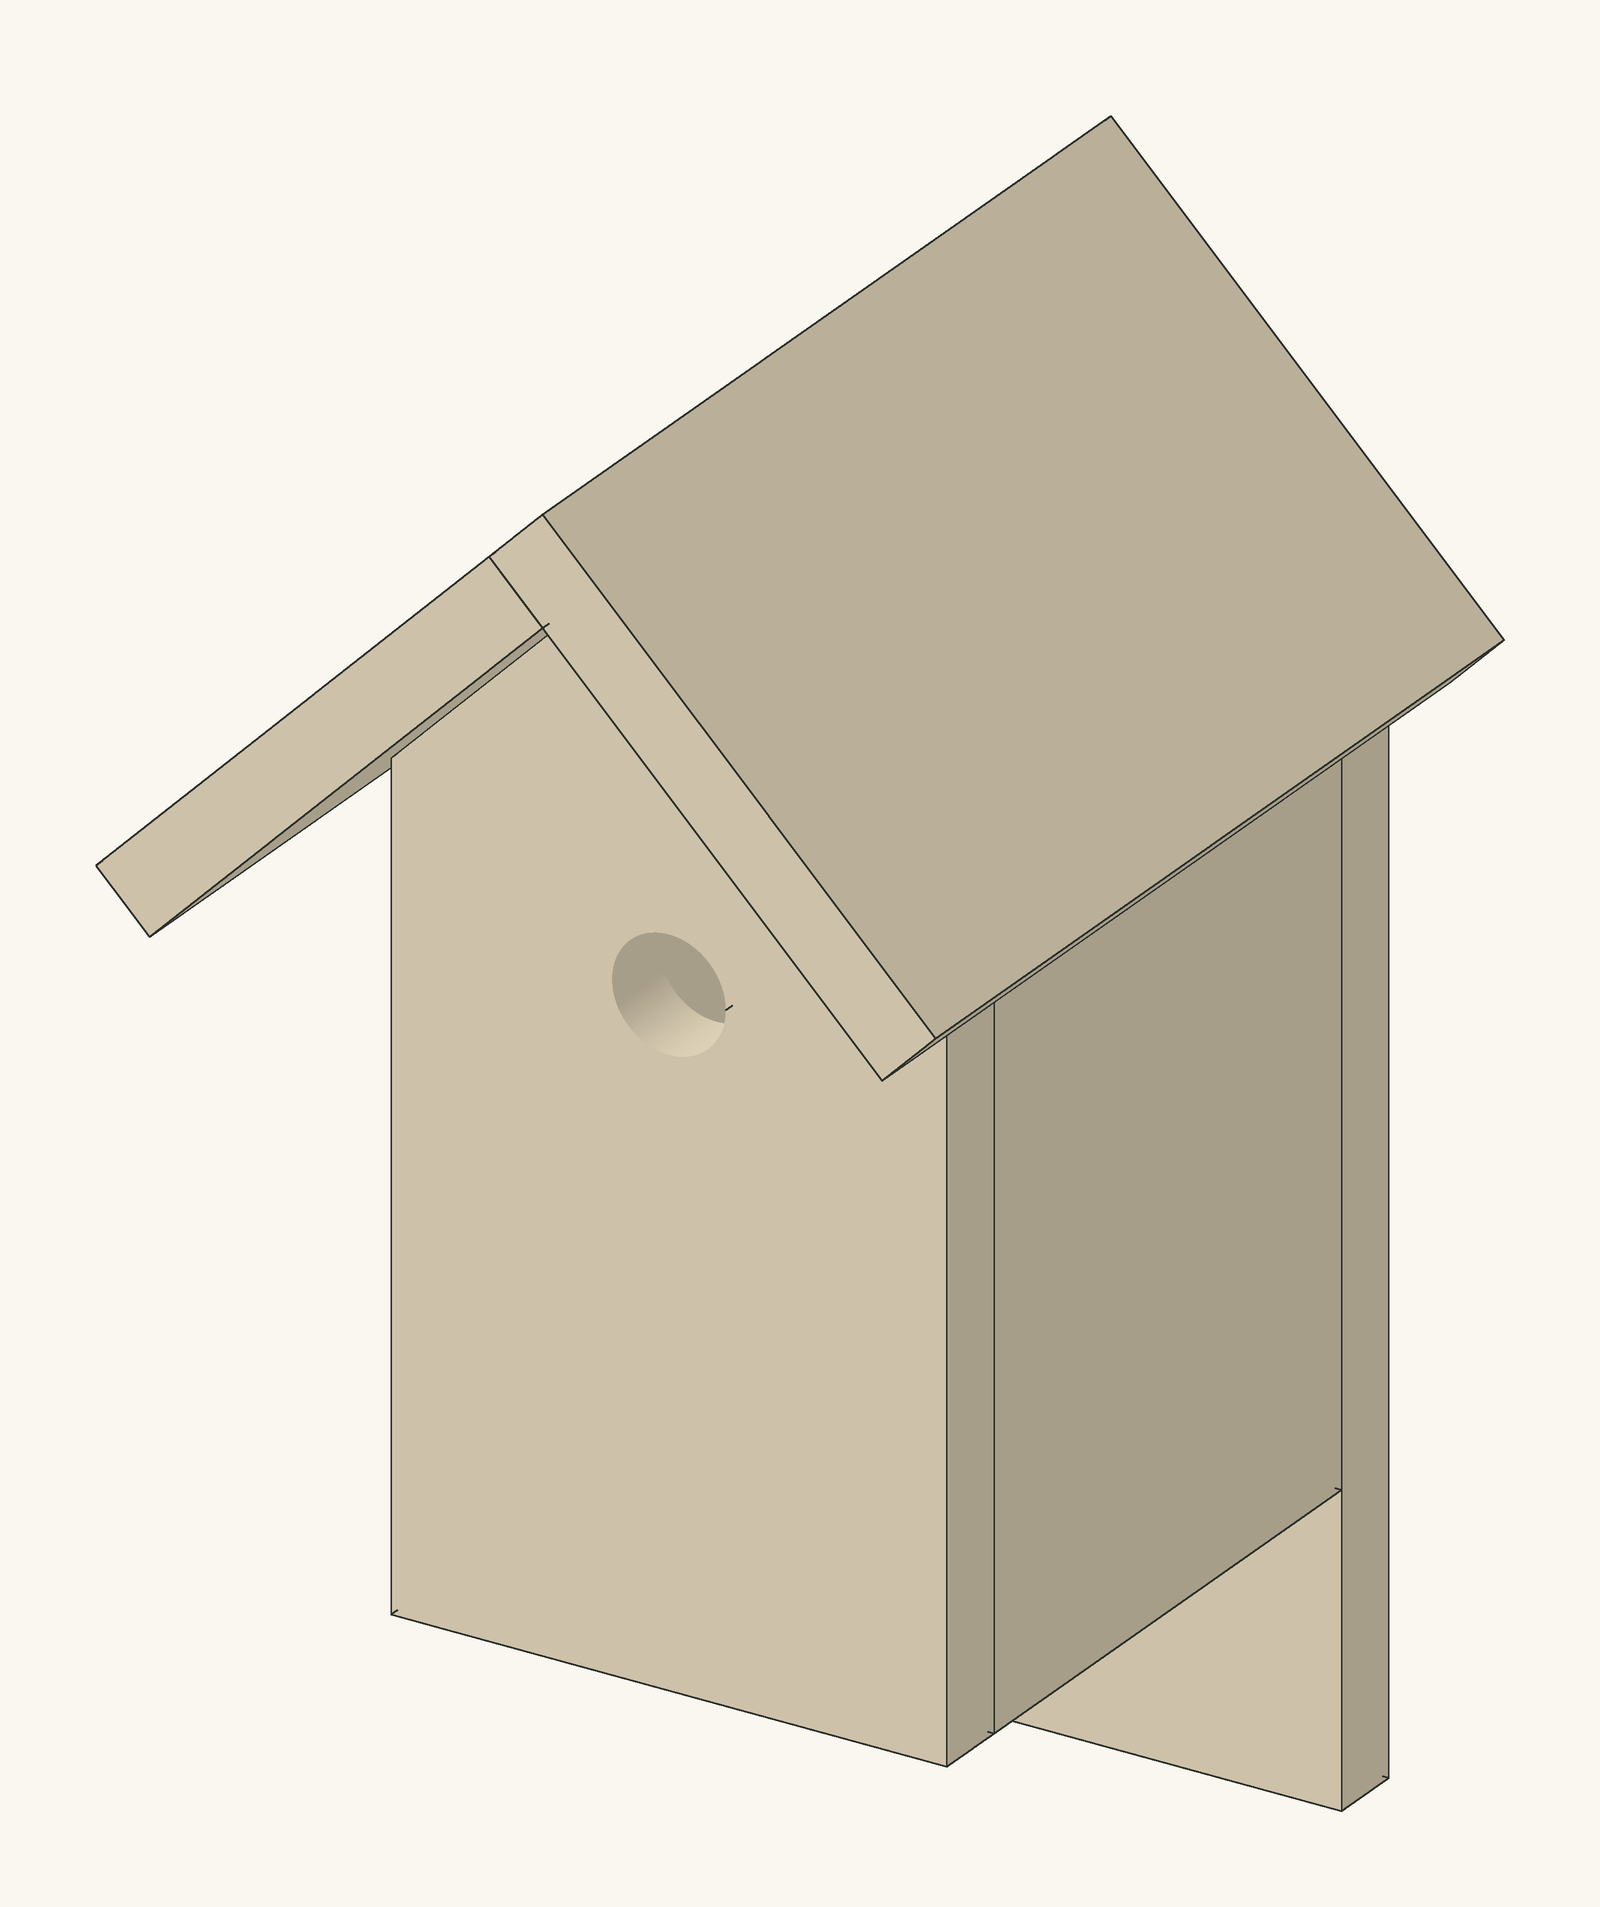
A nest box is one of the quickest garden builds there is, and one of the most rewarding: if you put it up in autumn or winter, there is a good chance that a pair of chickadees or tits will be raising a brood in it by spring. This one is built the traditional way, with a pointed front and back, two roof boards at 45° and a small floor, and every part comes from a single 1×6 board without any ripping.
The box is deliberately simple. There is no perch under the hole, because birds do not need one and predators use it. The floor sits ¼ in (6 mm) up from the bottom of the walls so rainwater drips off the edges instead of soaking into it, and the sides stop at the eaves, which leaves a narrow gap under the roof for air. The roof overhangs the front by 2 in (5 cm) to keep rain out of the hole, and is flush at the back so the box fits tight against a post.
The hole size decides who moves in. A 1⅛ in (28 mm) hole suits chickadees and great tits; a 1 in (25 mm) hole keeps it to smaller birds such as blue tits; bluebirds and starlings need larger holes and deeper boxes. The hole centre is 5½ in (14 cm) above the floor, so the chicks are well below it.
We designed it as a 3D model using real lumber sizes and a script checked that no two boards overlap, that every board touches and can be fixed to another, and that each board in the model is exactly the size in the cut list. The cut list, the cutting diagram and the step drawings on this page all come from that same model, so they cannot disagree. We have not built this exact design ourselves yet, so measure your real boards as you go: lumber varies slightly in width and thickness.
| Item | Qty | Notes |
|---|---|---|
| 1×6 boards, 8 ft (2.4 m), untreated | 1 | About 6 ft is used; a shorter offcut will do |
| Exterior screws 1¼ in (32 mm) or galvanised nails | About 20 | |
| Screws for mounting, about 2 in (50 mm) | 2 | Or two stainless screws and plastic plugs for a wall |
| Part | Qty | Length | Section | Notes |
|---|---|---|---|---|
| A · Front | 1 | 10¾ in (273 mm) | 1×6 (¾ × 5½ in / 19 × 140 mm) | Pressure-treated or cedar. Two 45° cuts to a point at the top; 1⅛ in hole |
| B · Back | 1 | 13¾ in (349 mm) | 1×6 (¾ × 5½ in / 19 × 140 mm) | Pressure-treated or cedar. Two 45° cuts to a point at the top |
| C · Side | 2 | 8 in (203 mm) | 1×6 (¾ × 5½ in / 19 × 140 mm) | Pressure-treated or cedar |
| D · Floor | 1 | 4 in (102 mm) | 1×6 (¾ × 5½ in / 19 × 140 mm) | Pressure-treated or cedar |
| E · Roof board | 2 | 9 in (229 mm) | 1×6 (¾ × 5½ in / 19 × 140 mm) | Pressure-treated or cedar. Square; lies at 45° |
The cut list comes straight from the 3D model, which is checked so that no two boards overlap, every board is joined to another and every board is exactly the length listed. Measure the real gaps before cutting the parts that fit between others.

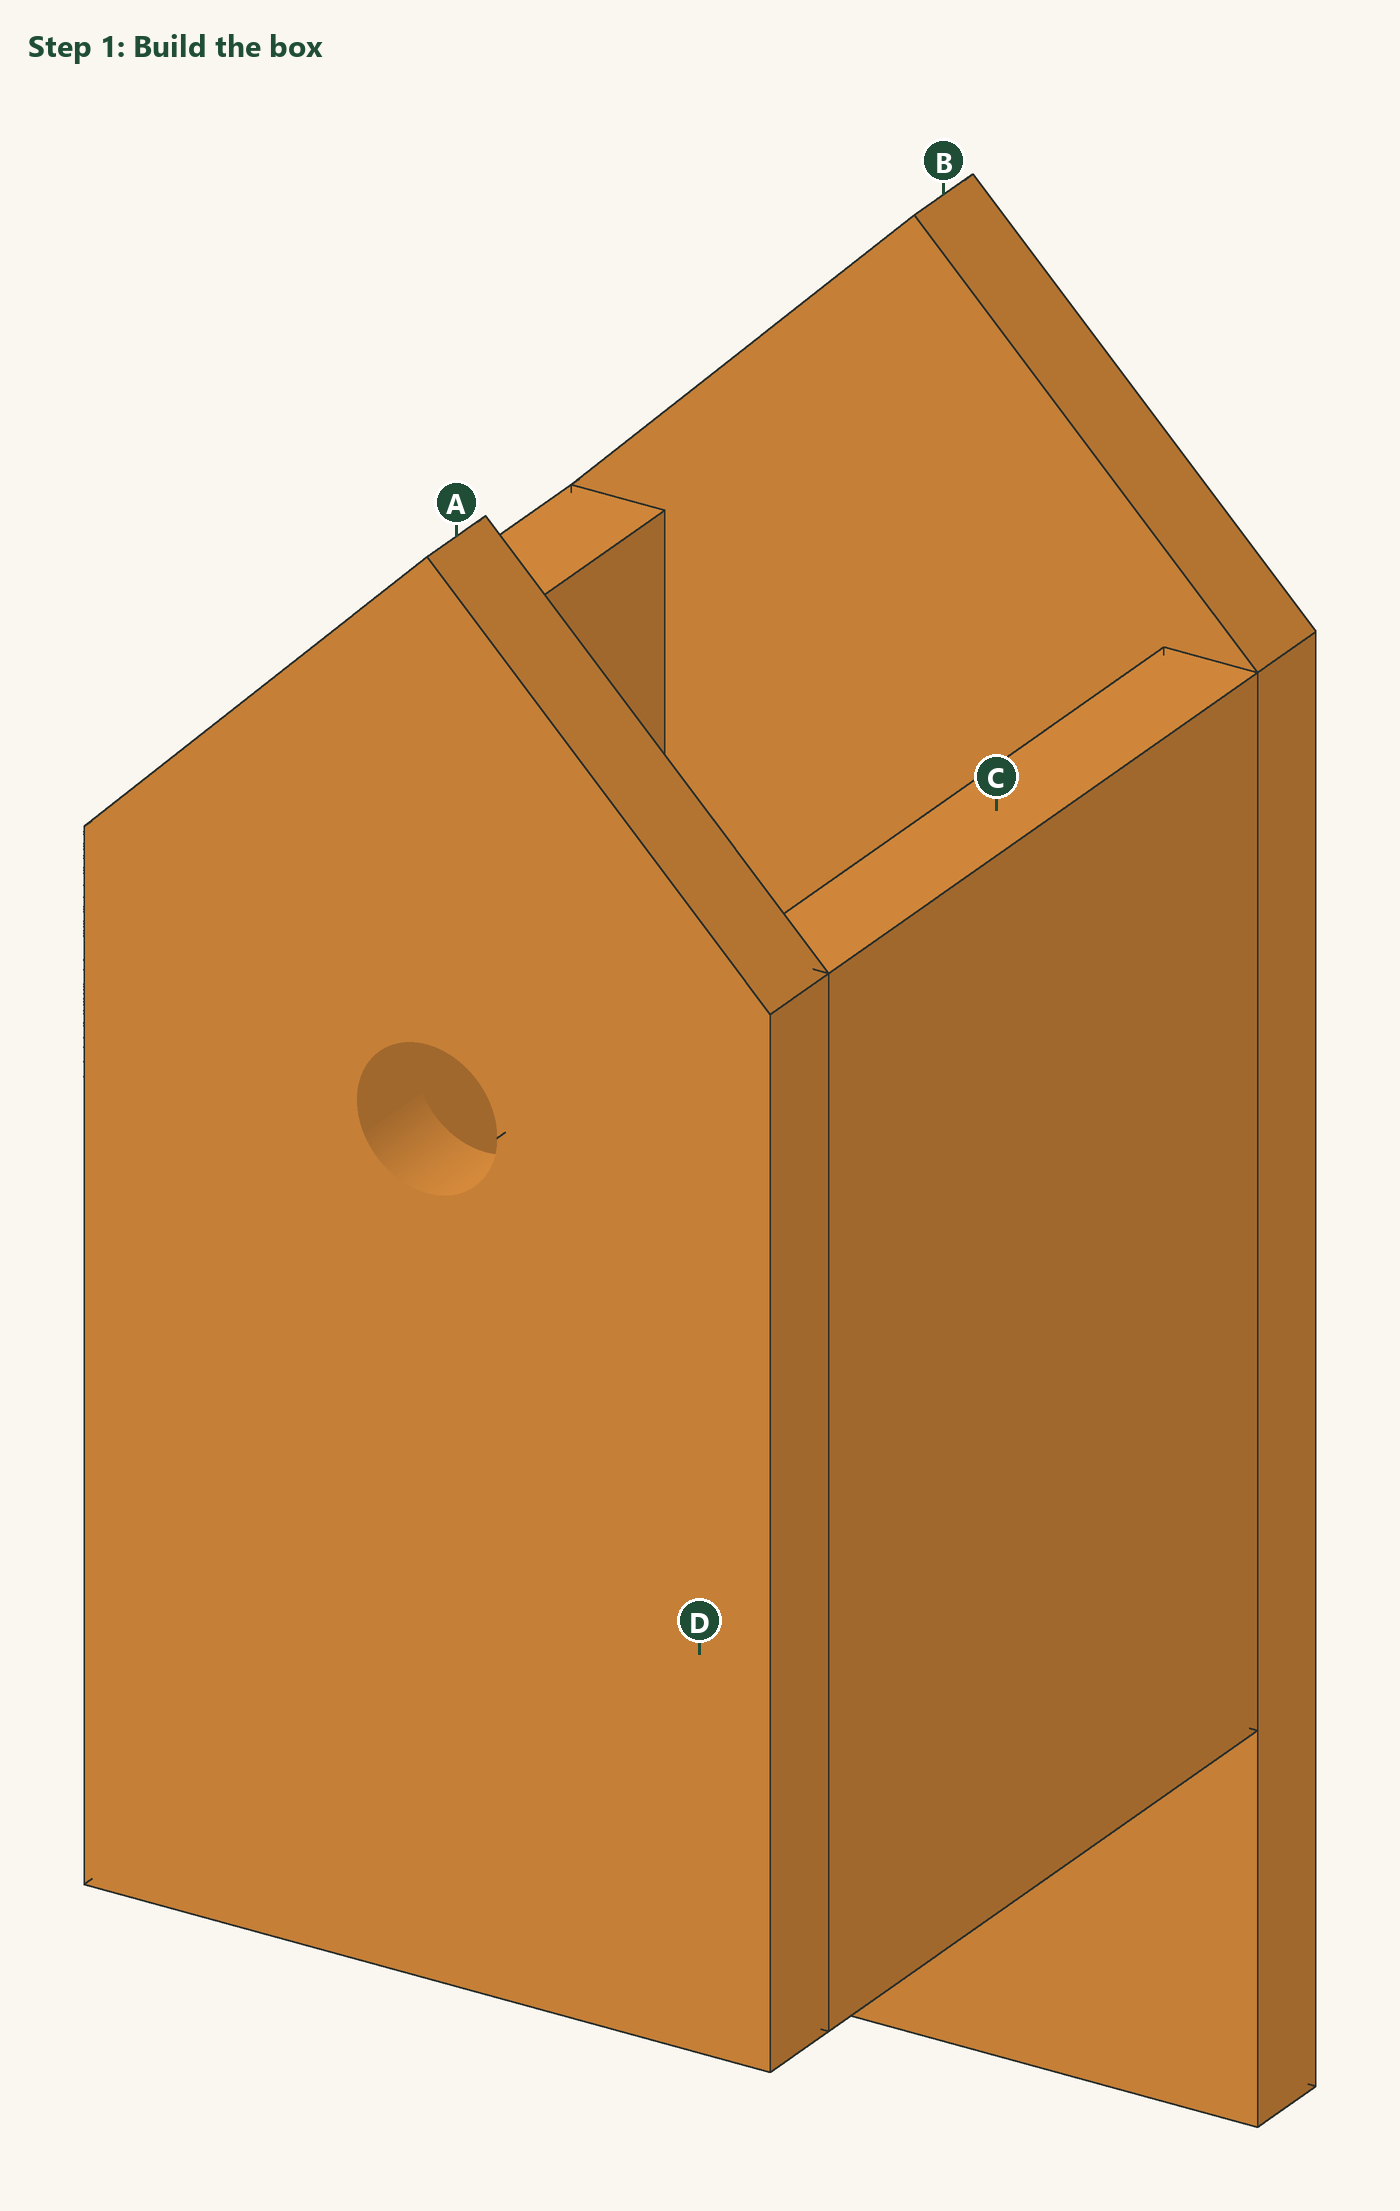
Cut the seven parts following the cutting diagram: the back (B, 13¾ in), the front (A, 10¾ in), two roof boards (E, 9 in), two sides (C, 8 in) and the floor (D, 4 in). On the front and the back, mark the centre of the top end and cut 45° from each corner of the board to that point, so each ends in a point like a house. On the back, the point is at the top and the extra 3 in is at the bottom.
Mark the hole on the centre line of the front, 6½ in (16.5 cm) up from its bottom edge, and drill it with the 1⅛ in bit, from both sides so the edges do not splinter. Sand the inside of the hole. Drill four ¼ in holes through the floor near the corners for drainage. Do not paint or treat the inside of the box.
Screw the two sides (C) to the back (B), 3 in up from its bottom, so the sides stand between the edges of the back and end level with the bottom of the point. Push the floor (D) in between the sides, ¼ in up from their bottom edges, and screw through the sides into it. Then screw the front (A) onto the sides. Fix one side with only one screw at each top corner, through the front and the back, so it can swing open like a door for cleaning, and hold it shut with one screw at the bottom.
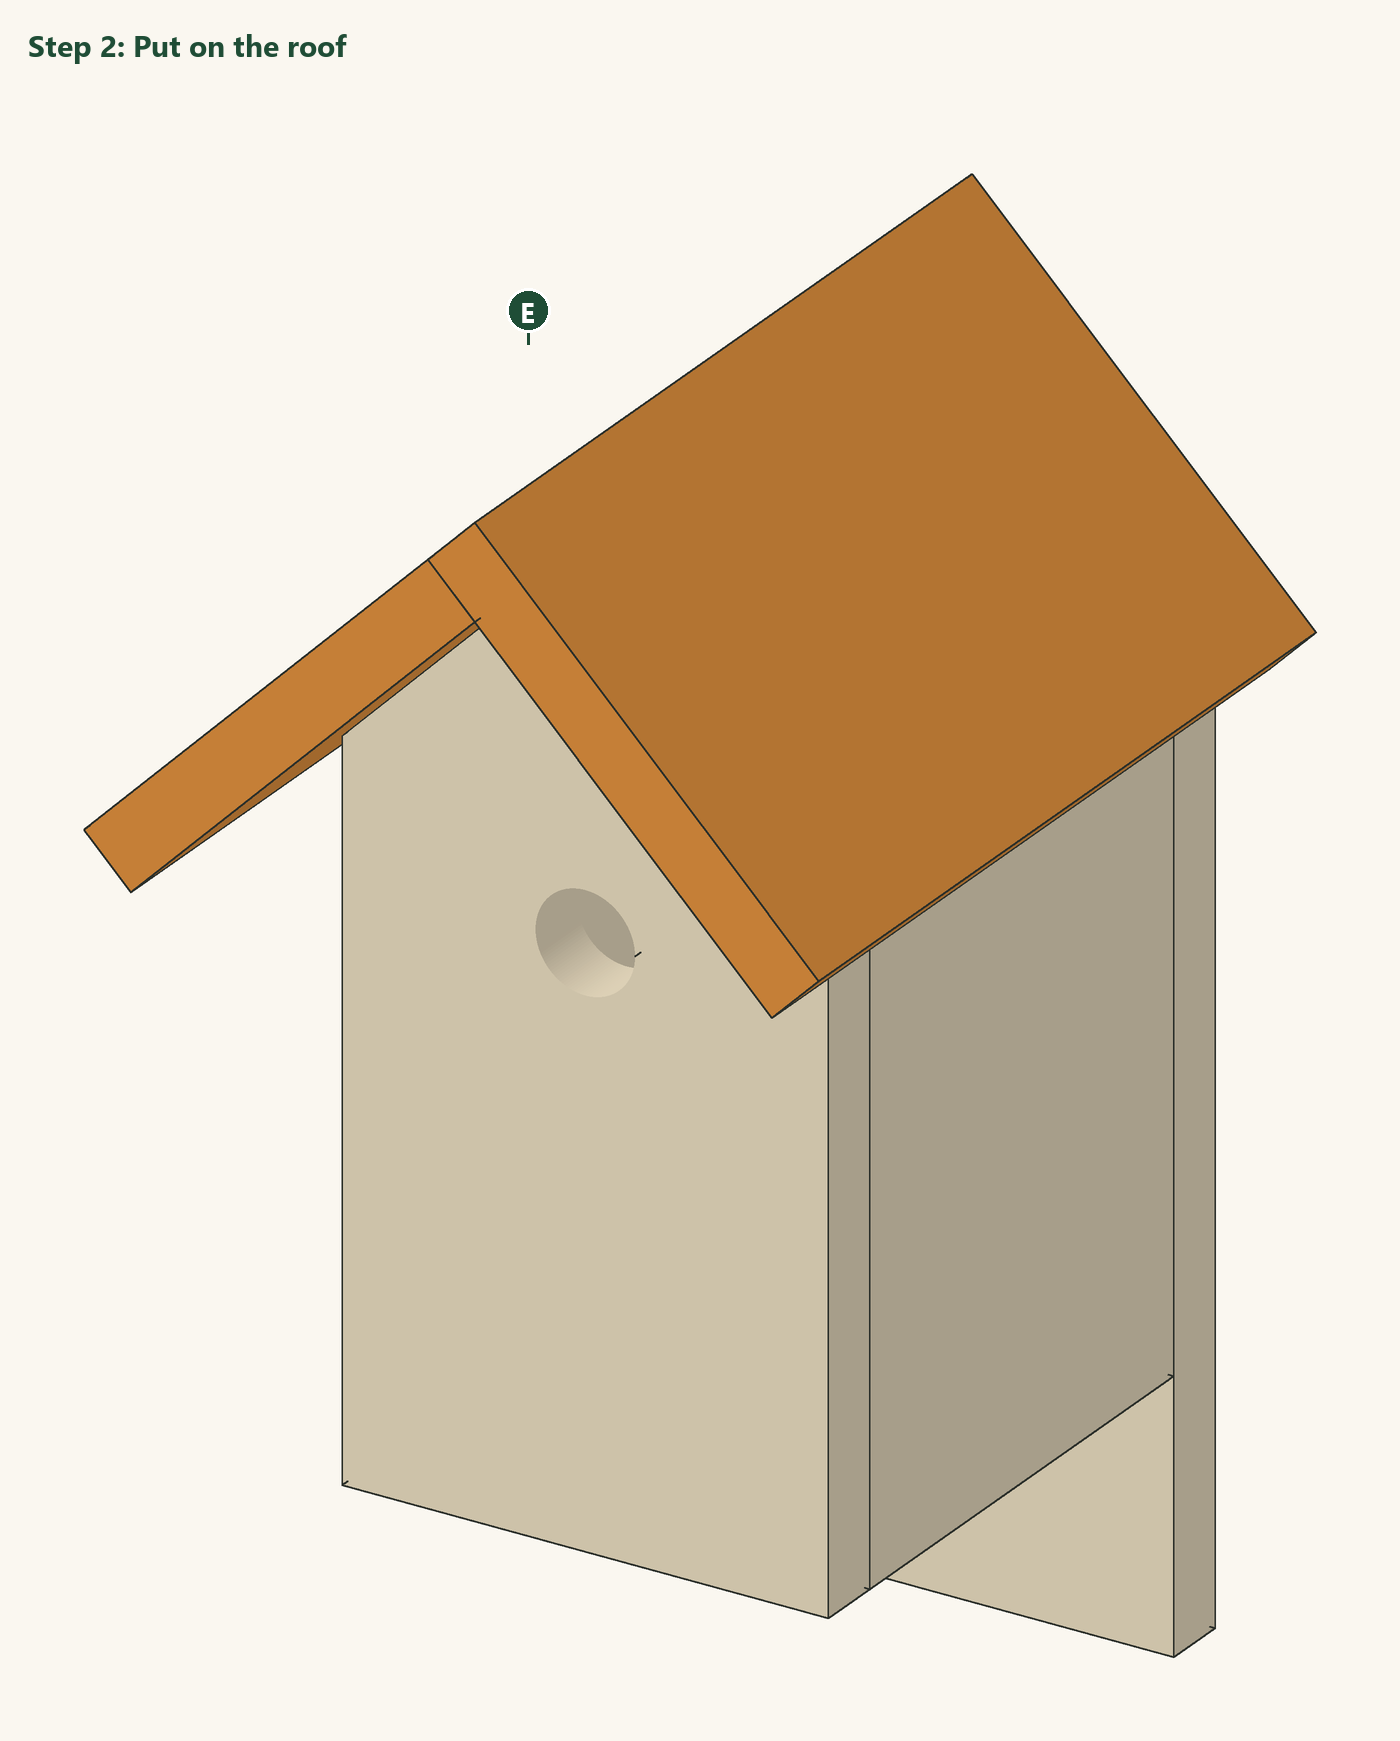
Lay the first roof board (E) on the left slope of the front and back, with its top edge level with the point and 2 in overhanging the front, flush at the back, and screw it to the front and the back. Lay the second roof board on the other slope so it covers the top edge of the first, and screw it the same way. A bead of glue along the ridge keeps rain out.
Screw the box through the extended back to a post, a wall or a tree trunk, 5–10 ft (1.5–3 m) above the ground, with the hole facing away from the prevailing wind and out of strong afternoon sun. Keep it away from feeders and out of reach of cats. Each autumn, open the side, take out the old nest and let the box dry before closing it again.
The 3D model and drawings of this design, free to download for your own build. Open STEP in Fusion 360, FreeCAD or most CAD programs; STL and OBJ in SketchUp (with an importer), Blender or a 3D viewer; DXF in any 2D CAD program. Units are inches.
About this design: designed and modelled by DIY Outdoor Builds; the text was drafted with AI assistance and checked against the model (see our editorial policy). Design, drawings and 3D files © DIY Outdoor Builds: free to download and build for your own use, please do not republish the files. We have not built this exact design yet.
Building work can be dangerous and may need a permit. Check local rules and use a qualified professional for electrical, gas and structural work.
Share your own version with your photos, measurements and what you changed.
Real buildOther Builds
 Real build
Other Builds
 Our design
Raised Garden Beds
 Our design
Storage Solutions
From diyoutdoorbuilds.com/builds/classic-wooden-birdhouse-1x6 · DIY Outdoor Builds