 Real build
Storage Solutions
Our designDesigned by DIY Outdoor Builds and checked board by board in a 3D model built from real lumber sizes. We have not built this one yet, so measure as you go.
A simple outdoor firewood rack, 6 ft (1.83 m) long and 4 ft (1.22 m) high, from eight 8 ft 2×4s. The base rails keep the logs off the wet ground, and braces in the top corners stop the rack from leaning sideways when it is full.
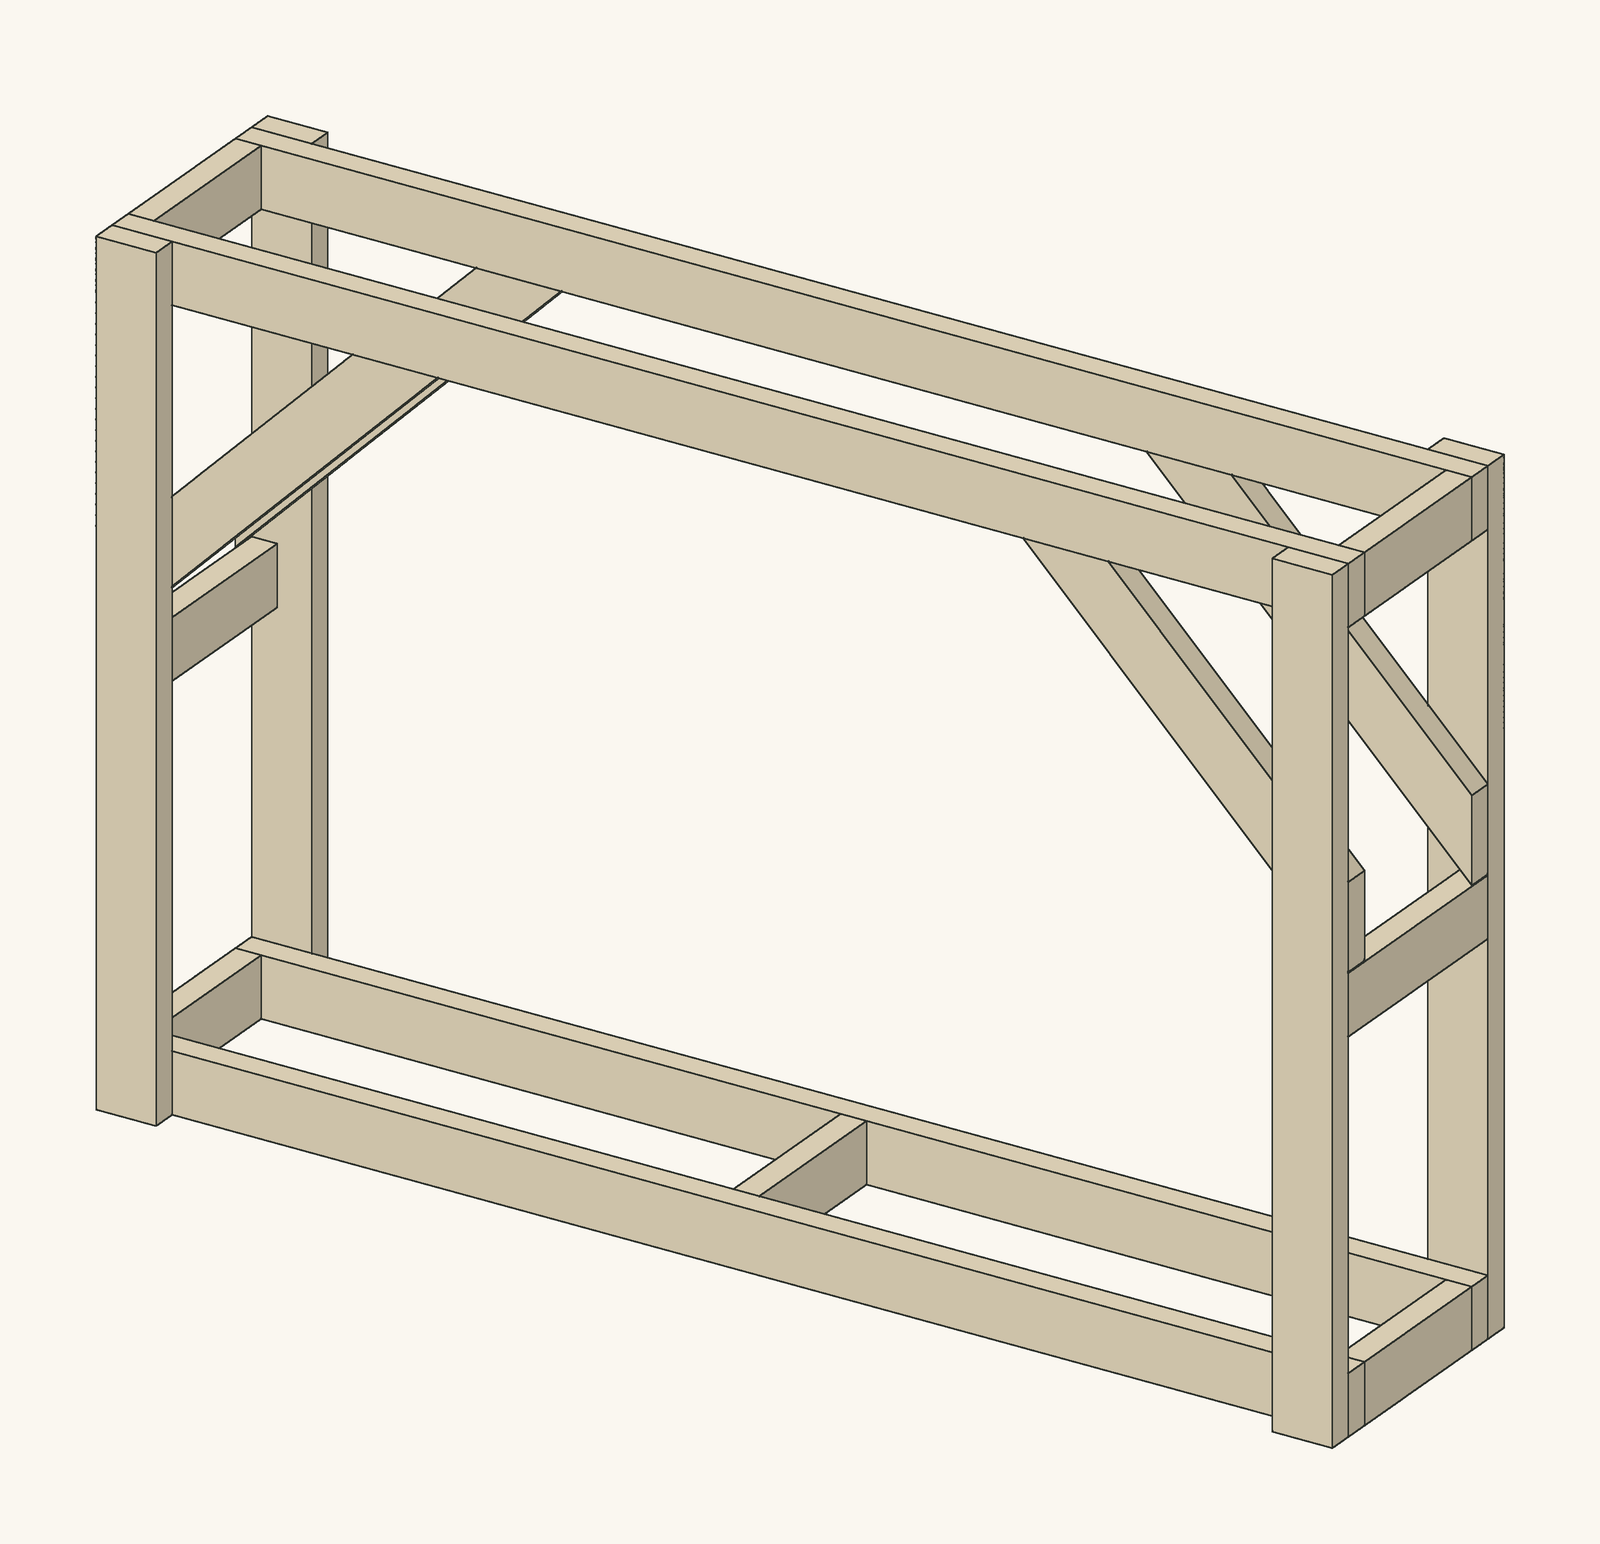
Firewood dries and keeps best off the ground, in the wind and preferably under a roof. A rack does the first two: the logs rest on two base rails 3½ in (89 mm) above the ground, with air all round them, and the ends hold the stack upright so you do not need to build crossed log towers at each end.
The rack has four uprights standing on the ground at the corners. The base rails and the top rails are screwed to the inside faces of the uprights, face to face, which is far stronger than standing the uprights on top of a base. Short cross pieces tie the base rails together, rungs tie each pair of uprights, and a 45° brace in each top corner makes the long sides rigid, so the rack does not fold over like a parallelogram when you stack against it.
The space for logs is 65 in (1.65 m) long between the uprights, 41 in (1.04 m) high and 16 in (41 cm) deep, which suits logs cut to 16 in or shorter: about 24 cu ft (0.7 m³), a little over half a face cord of 16 in logs. The braces take a small triangle out of the two top corners.
We designed it as a 3D model using real lumber sizes and a script checked that no two boards overlap, that every board touches and can be screwed to another, and that each board in the model is exactly the size in the cut list. The cut list, the cutting diagram and the step drawings on this page all come from that same model, so they cannot disagree. We have not built this exact design ourselves yet, so measure your real boards as you go: lumber varies slightly in width and is rarely perfectly straight.
| Item | Qty | Notes |
|---|---|---|
| 2×4 boards, 8 ft (2.4 m), pressure-treated | 8 | Exactly what the cutting diagram uses |
| Exterior screws 3 in (76 mm) | About 70 | Three or four at every joint |
| Flat pavers or bricks | 4 | Under the uprights, so the end grain does not stand in wet soil |
| Part | Qty | Length | Section | Notes |
|---|---|---|---|---|
| A · Upright | 4 | 48 in (1219 mm) | 2×4 (1½ × 3½ in / 38 × 89 mm) | Pressure-treated or cedar |
| B · Base rail | 2 | 72 in (1829 mm) | 2×4 (1½ × 3½ in / 38 × 89 mm) | Pressure-treated or cedar |
| C · Base cross piece | 3 | 10 in (254 mm) | 2×4 (1½ × 3½ in / 38 × 89 mm) | Pressure-treated or cedar |
| D · End rung | 2 | 13 in (330 mm) | 2×4 (1½ × 3½ in / 38 × 89 mm) | Pressure-treated or cedar |
| E · Top rail | 2 | 72 in (1829 mm) | 2×4 (1½ × 3½ in / 38 × 89 mm) | Pressure-treated or cedar |
| F · Corner brace | 4 | 26⅞ in (681 mm) | 2×4 (1½ × 3½ in / 38 × 89 mm) | Pressure-treated or cedar. 45° at both ends, one plumb and one level; length is the long edge |
| G · Top rung | 2 | 10 in (254 mm) | 2×4 (1½ × 3½ in / 38 × 89 mm) | Pressure-treated or cedar |
The cut list comes straight from the 3D model, which is checked so that no two boards overlap, every board is joined to another and every board is exactly the length listed. Measure the real gaps before cutting the parts that fit between others.
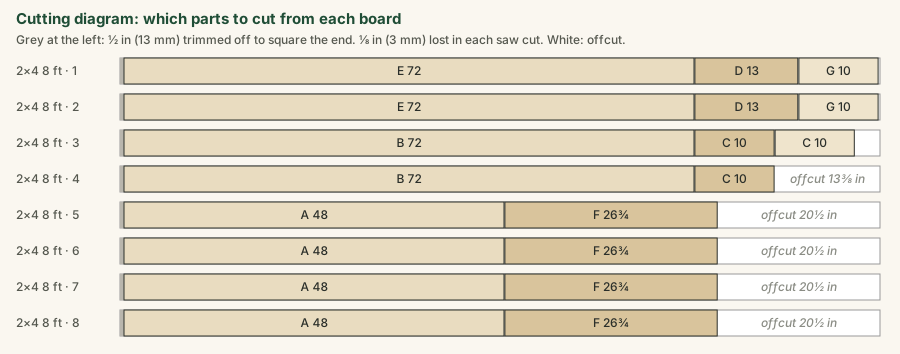
Cut the 19 parts following the cutting diagram: four 72 in rails (B and E), four 48 in uprights (A), three 10 in base cross pieces (C), two 13 in end rungs (D), two 10 in top rungs (G) and four corner braces (F). The braces are 26¾ in along their long edge, with 45° cuts at both ends that are not parallel: lay out one end, then flip the square to mark the other so the brace forms a trapezoid.
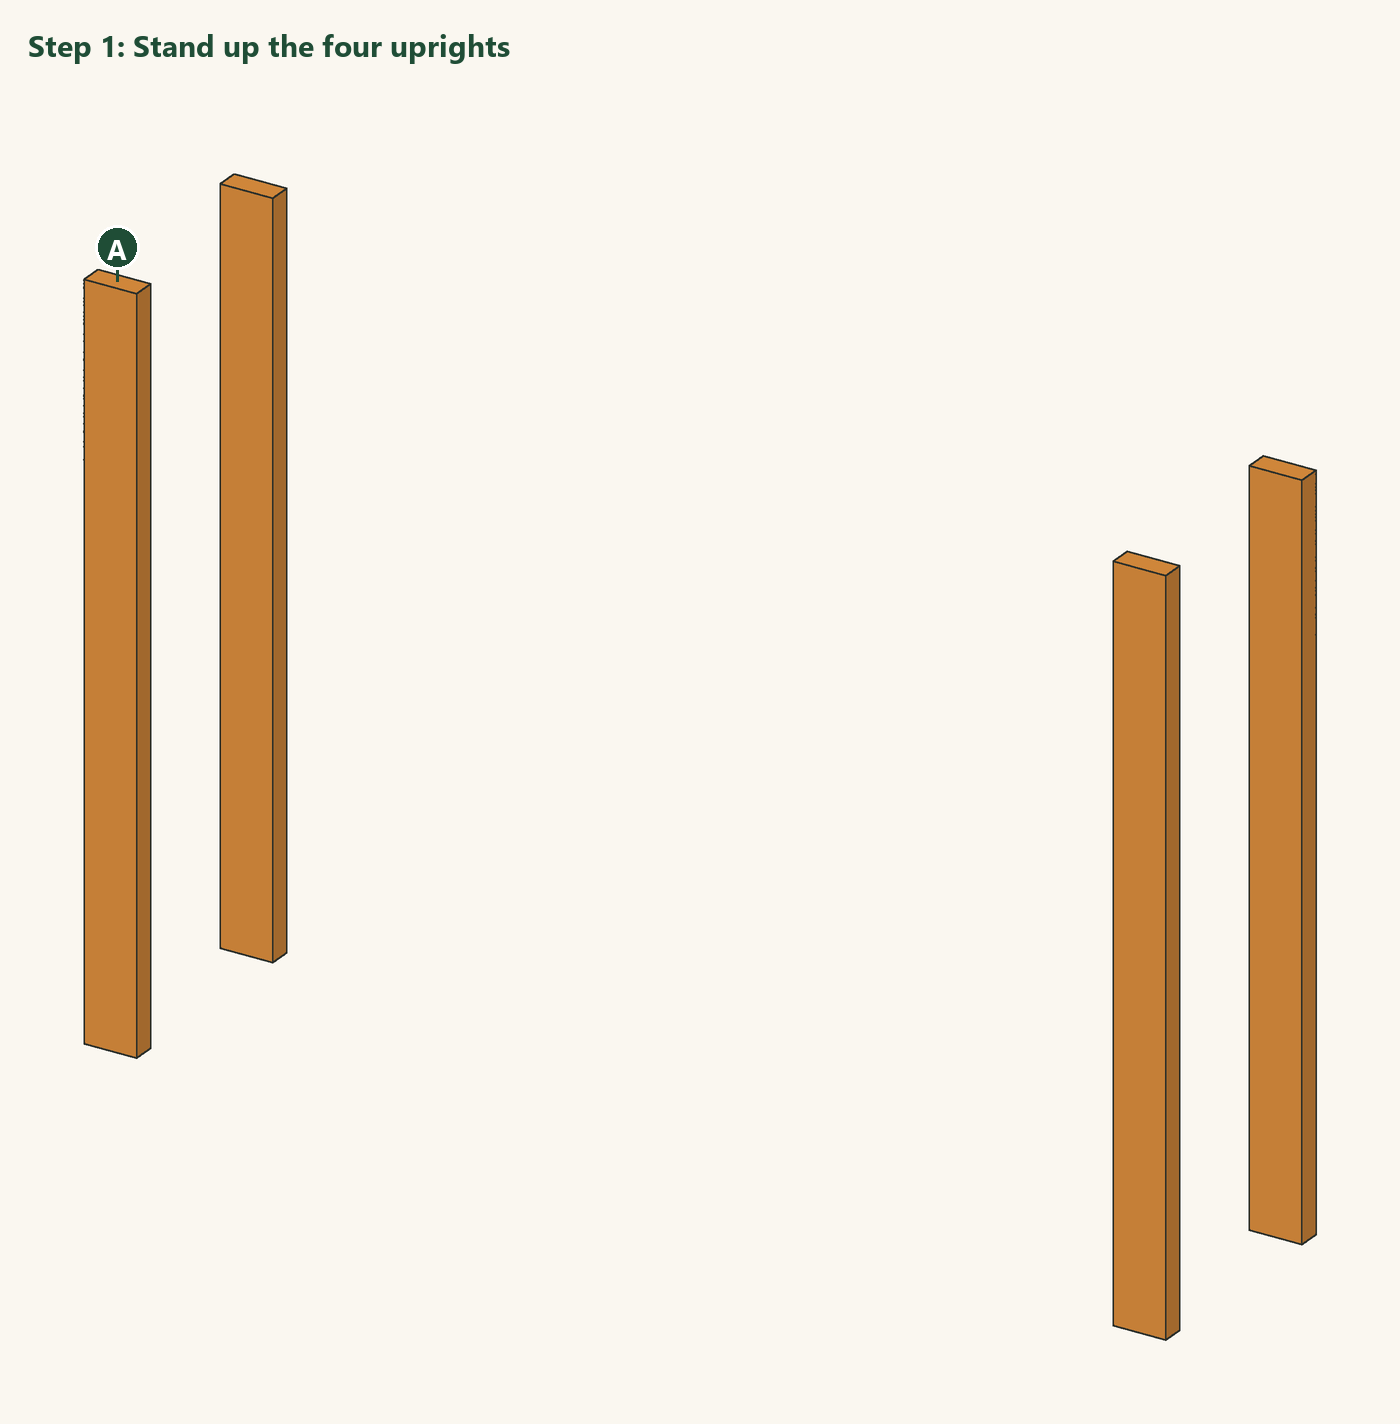
Set four pavers level on the ground at the corners of a 72 × 16 in rectangle and stand an upright (A) on each, with the 3½ in face along the length of the rack. Have a helper hold them or brace each one with a scrap board and a clamp until the rails are on.
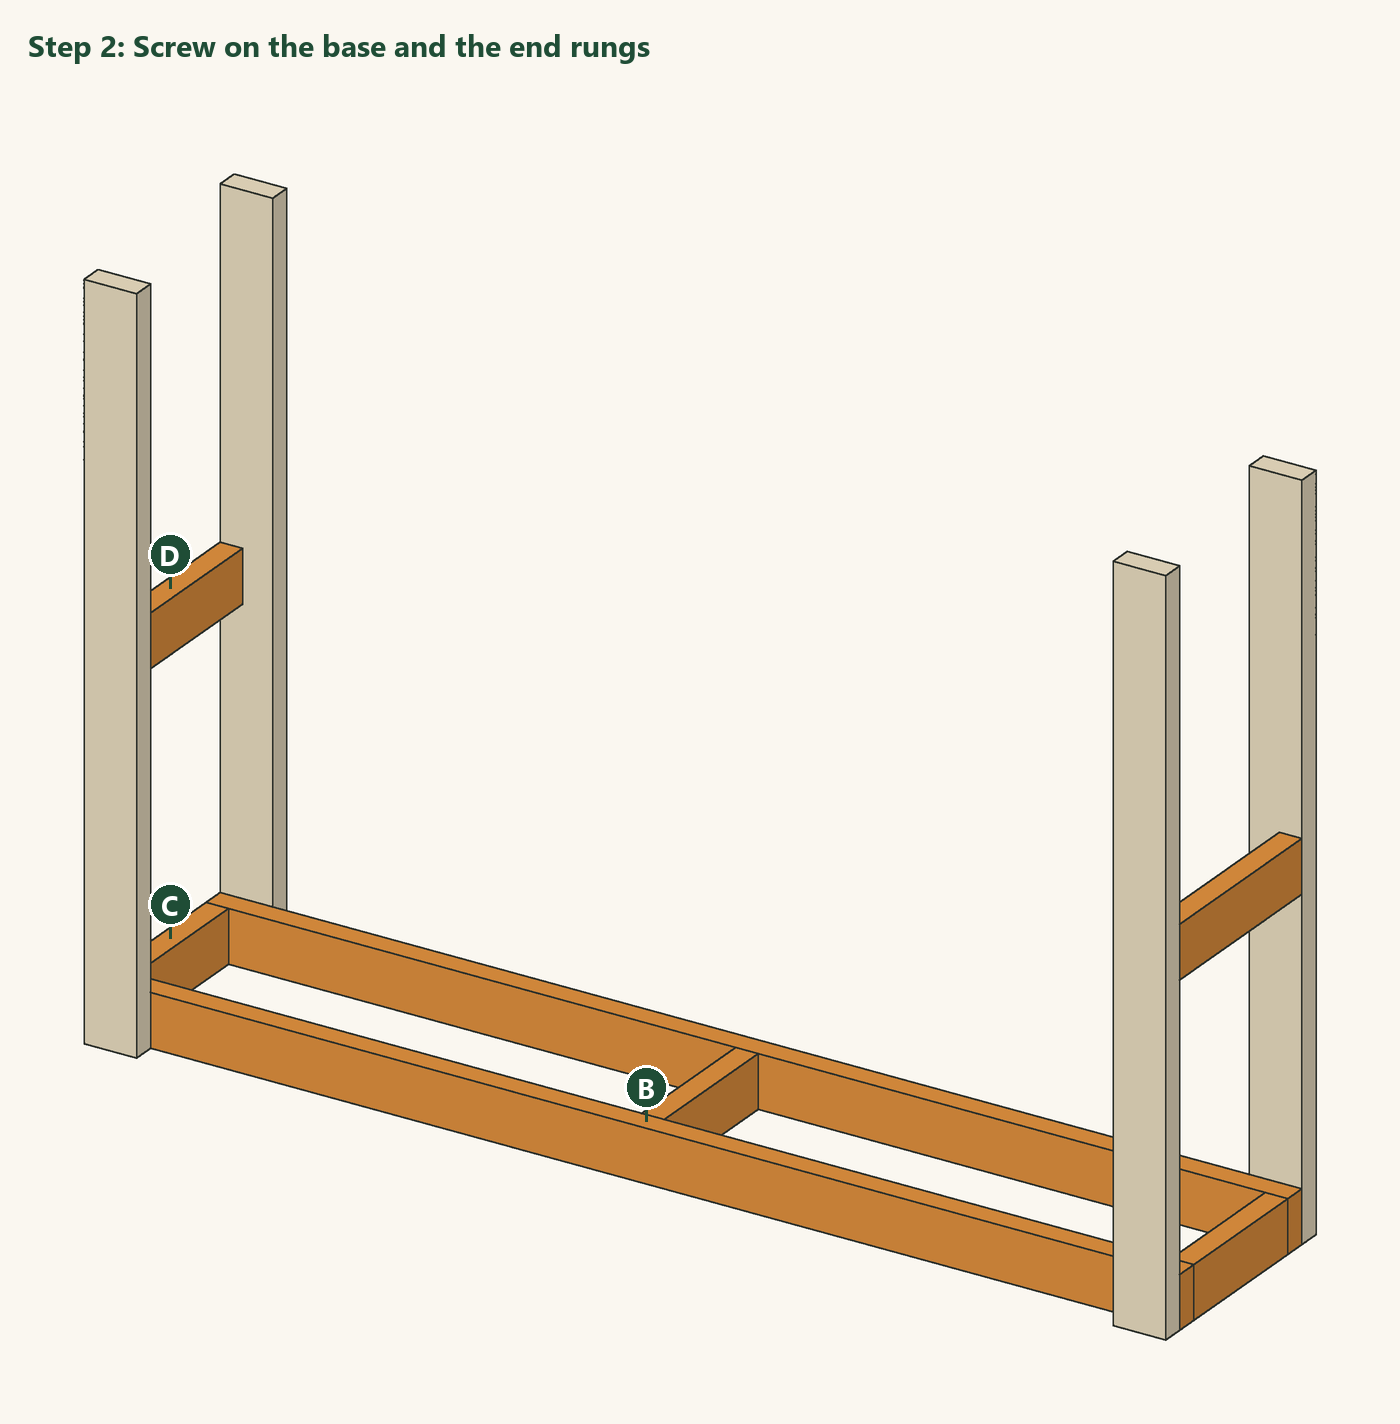
Clamp a base rail (B) on edge against the inside faces of the front uprights, flush with the ground and with the ends of the uprights, and screw through the uprights into it with three screws at each end. Fit the back base rail the same way. Screw the three base cross pieces (C) between the rails, one at each end and one in the middle. Finally screw an end rung (D) between the two uprights at each end, its bottom 22 in (56 cm) above the ground.
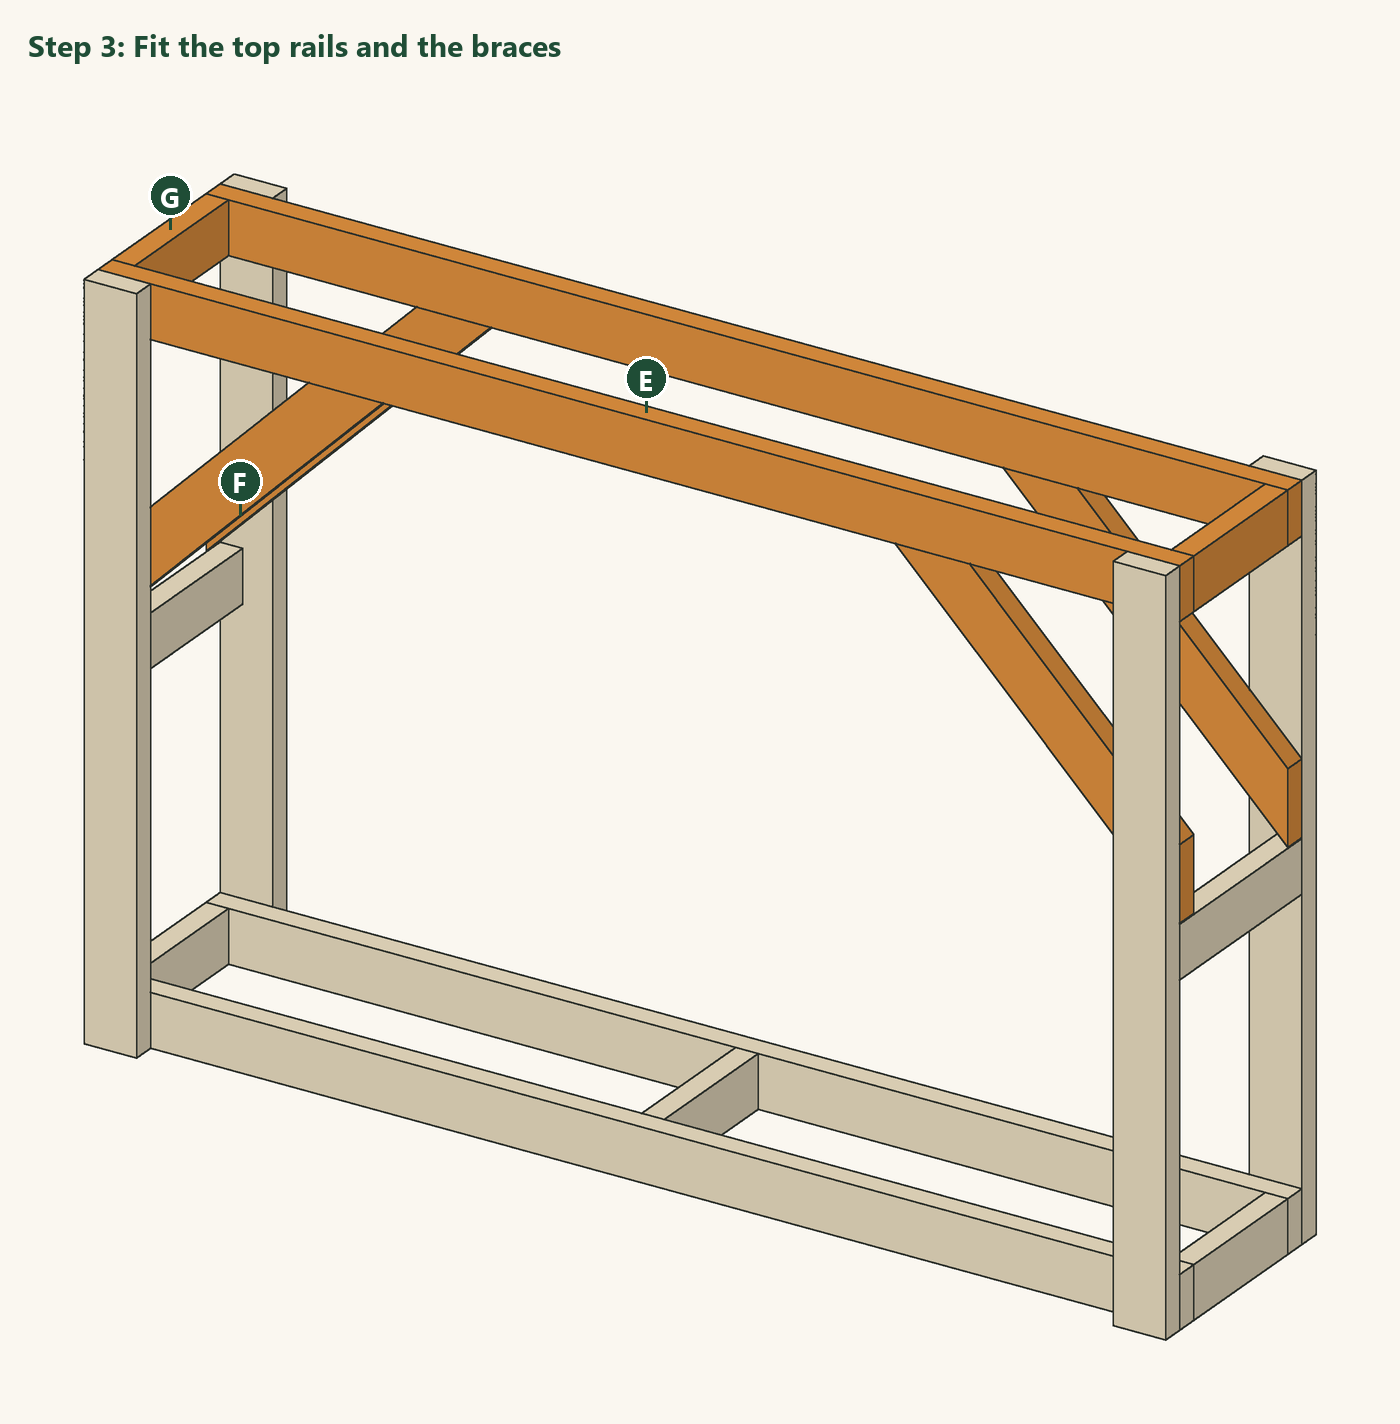
Clamp the top rails (E) against the inside faces of the uprights, flush with their tops, and screw them on. Fit a top rung (G) between the two top rails at each end. Then hold a corner brace (F) in each top corner, its long edge down, with the plumb end flat against the upright and the level end tight under the top rail, and screw it to the upright and up into the rail. The braces pull the rack square, so check that the uprights are plumb before fixing the last ones.
Stack the logs across the base rails, bark side up on the top layer, and keep them a little away from the uprights so air can move. Cover the top with a piece of corrugated roofing or a tarp held by a few logs, but leave the sides open; wood under a closed tarp sweats instead of drying.
The 3D model and drawings of this design, free to download for your own build. Open STEP in Fusion 360, FreeCAD or most CAD programs; STL and OBJ in SketchUp (with an importer), Blender or a 3D viewer; DXF in any 2D CAD program. Units are inches.
About this design: designed and modelled by DIY Outdoor Builds; the text was drafted with AI assistance and checked against the model (see our editorial policy). Design, drawings and 3D files © DIY Outdoor Builds: free to download and build for your own use, please do not republish the files. We have not built this exact design yet.
Building work can be dangerous and may need a permit. Check local rules and use a qualified professional for electrical, gas and structural work.
Share your own version with your photos, measurements and what you changed.
Real buildStorage Solutions
 Our design
Raised Garden Beds
 Our design
Other Builds
 Our design
Outdoor Furniture
From diyoutdoorbuilds.com/builds/6-ft-firewood-rack-2x4 · DIY Outdoor Builds