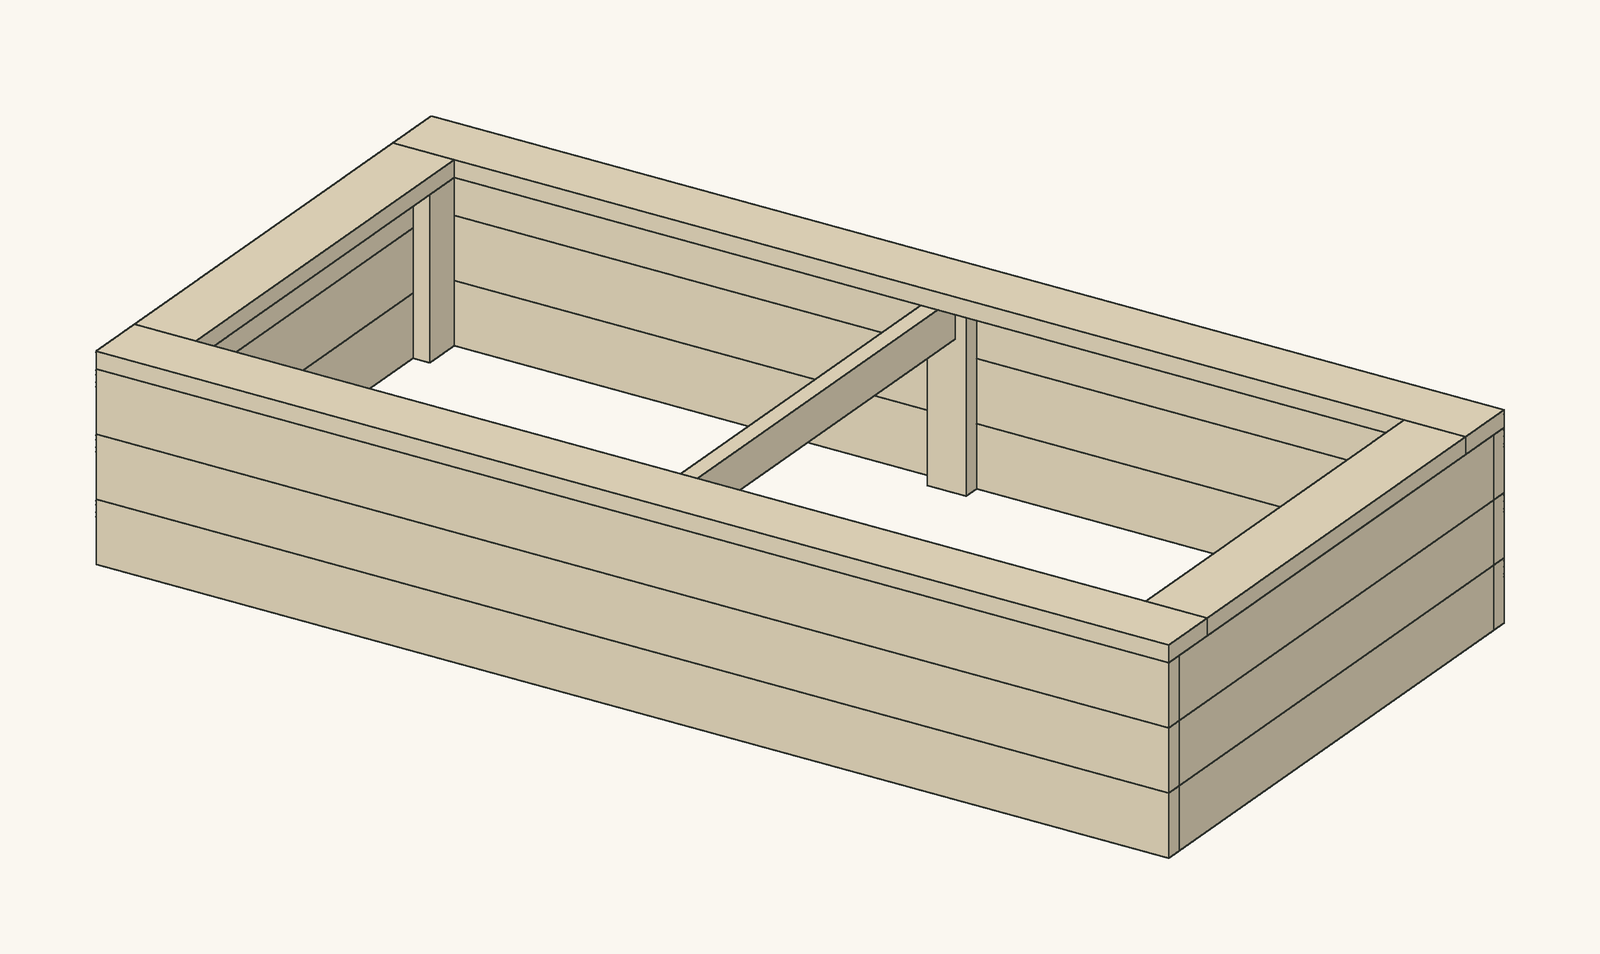
 Our design
Raised Garden Beds
Our designDesigned by DIY Outdoor Builds and checked board by board in a 3D model built from real lumber sizes. We have not built this one yet, so measure as you go.
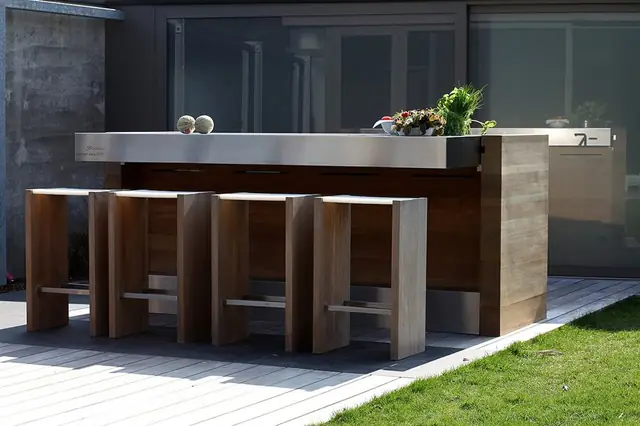
A long prep counter for beside the grill: a 2×6 top at kitchen height, room underneath for a bin, a cooler and charcoal, and a back wall with a shelf on top for spices, oil and tools. Built from standard lumber, with every board modelled and checked in 3D.
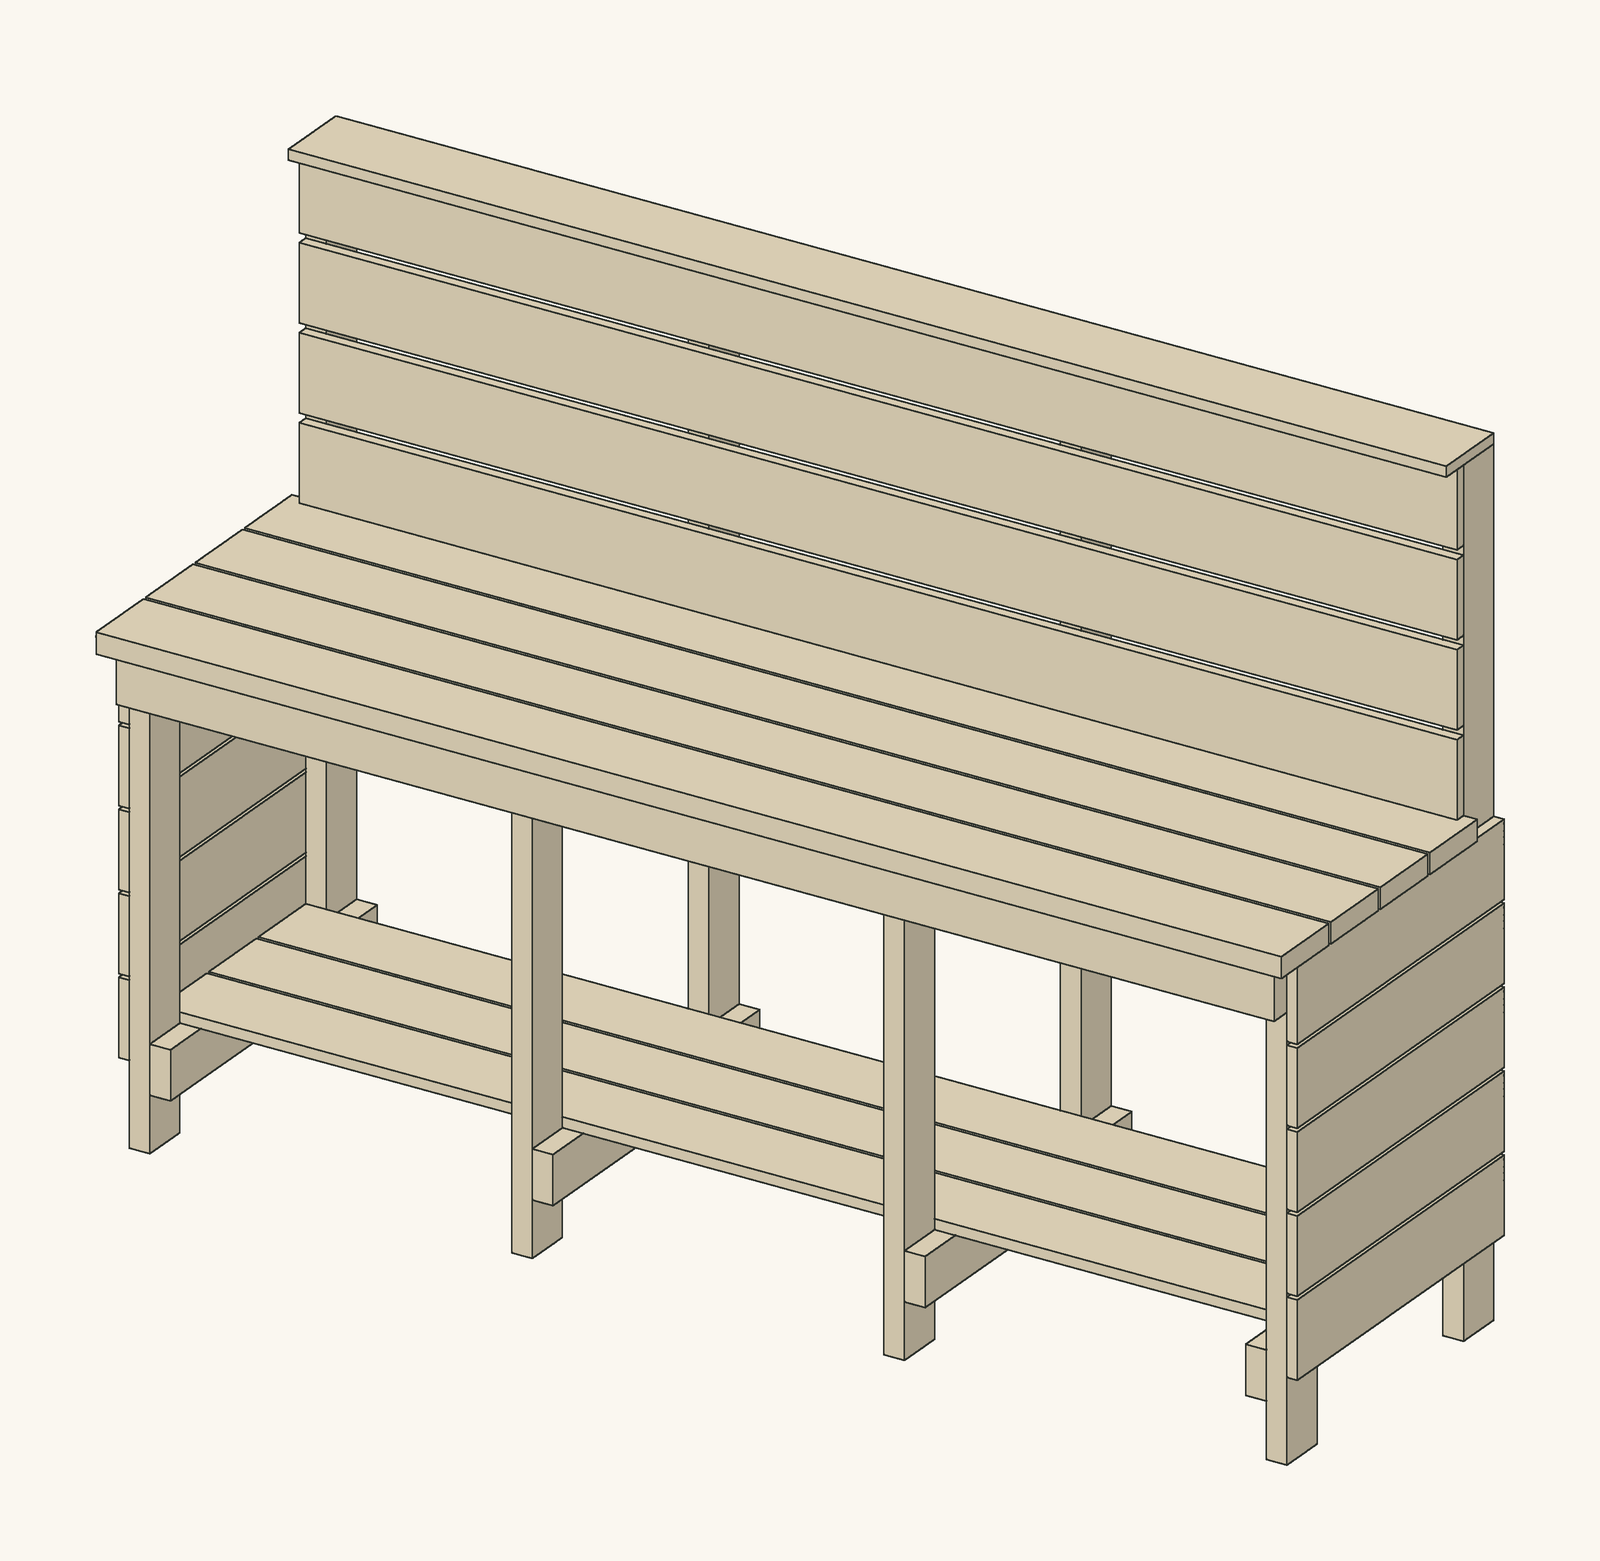
Most grills come with almost no space to put anything down. This counter gives you 7 ft (2.1 m) of it, at 36 in (91 cm), the height of an indoor kitchen counter, so cutting and plating feel the same as inside. It stands beside the grill, not around it, so the wood never has to sit next to the heat.
The frame is simple: four front legs, four taller back posts, a rail along the front and the back under the top, and cross rails beside every leg. The back posts carry on up past the counter to hold a back wall of four 1×6 boards and a narrow shelf on top, about 5 ft (1.5 m) up, for spices, oil, tongs and a lamp. Hooks for tools screw straight into the back boards.
Under the counter, three bays about 26 in (66 cm) wide hold a bin, a cooler or a bag of charcoal on a shelf of 1×6 boards, with about 22¾ in (58 cm) of headroom. The ends are closed with horizontal 1×6 slats, which also stiffen the frame sideways; the back wall does the same along the length.
We modelled the counter board by board in 3D and checked that no two boards overlap and every board is fixed to another. We have not built this exact counter yet, so check that the frame is square before you screw on the top.
| Item | Qty | Notes |
|---|---|---|
| 2×4 boards, 8 ft (2.4 m), pressure-treated | 8 | Legs, back posts, rails and cross rails |
| 2×6 boards, 8 ft (2.4 m), pressure-treated or cedar | 4 | Counter top |
| 1×6 boards, 8 ft (2.4 m) | 12 | Lower shelf, end slats, back boards and cap shelf |
| Exterior screws 3 in (76 mm) | About 80 | Frame and top |
| Exterior screws 1⅝ in (41 mm) | About 170 | 1×6 boards |
| Pavers or patio stones | 8 | Under the legs and posts if the counter stands on soil or grass |
| Part | Qty | Length | Section | Notes |
|---|---|---|---|---|
| A · Front leg | 4 | 34½ in (876 mm) | 2×4 (1½ × 3½ in / 38 × 89 mm) | Pressure-treated or cedar |
| B · Back post | 4 | 60 in (1524 mm) | 2×4 (1½ × 3½ in / 38 × 89 mm) | Pressure-treated or cedar |
| C · Back rail | 1 | 84 in (2134 mm) | 2×4 (1½ × 3½ in / 38 × 89 mm) | Pressure-treated or cedar |
| C · Front rail | 1 | 84 in (2134 mm) | 2×4 (1½ × 3½ in / 38 × 89 mm) | Pressure-treated or cedar |
| D · Top cross rail | 4 | 19 in (483 mm) | 2×4 (1½ × 3½ in / 38 × 89 mm) | Pressure-treated or cedar |
| E · Lower cross rail | 4 | 24 in (610 mm) | 2×4 (1½ × 3½ in / 38 × 89 mm) | Pressure-treated or cedar |
| F · Shelf board | 3 | 84 in (2134 mm) | 1×6 (¾ × 5½ in / 19 × 140 mm) | Pressure-treated or cedar |
| G · End slat | 10 | 24 in (610 mm) | 1×6 (¾ × 5½ in / 19 × 140 mm) | Pressure-treated or cedar |
| H · Top board | 4 | 86 in (2184 mm) | 2×6 (1½ × 5½ in / 38 × 140 mm) | Pressure-treated or cedar |
| J · Back board | 4 | 84 in (2134 mm) | 1×6 (¾ × 5½ in / 19 × 140 mm) | Pressure-treated or cedar |
| K · Cap shelf | 1 | 84 in (2134 mm) | 1×6 (¾ × 5½ in / 19 × 140 mm) | Pressure-treated or cedar |
The cut list comes straight from the 3D model, which is checked so that no two boards overlap, every board is joined to another and every board is exactly the length listed. Measure the real gaps before cutting the parts that fit between others.
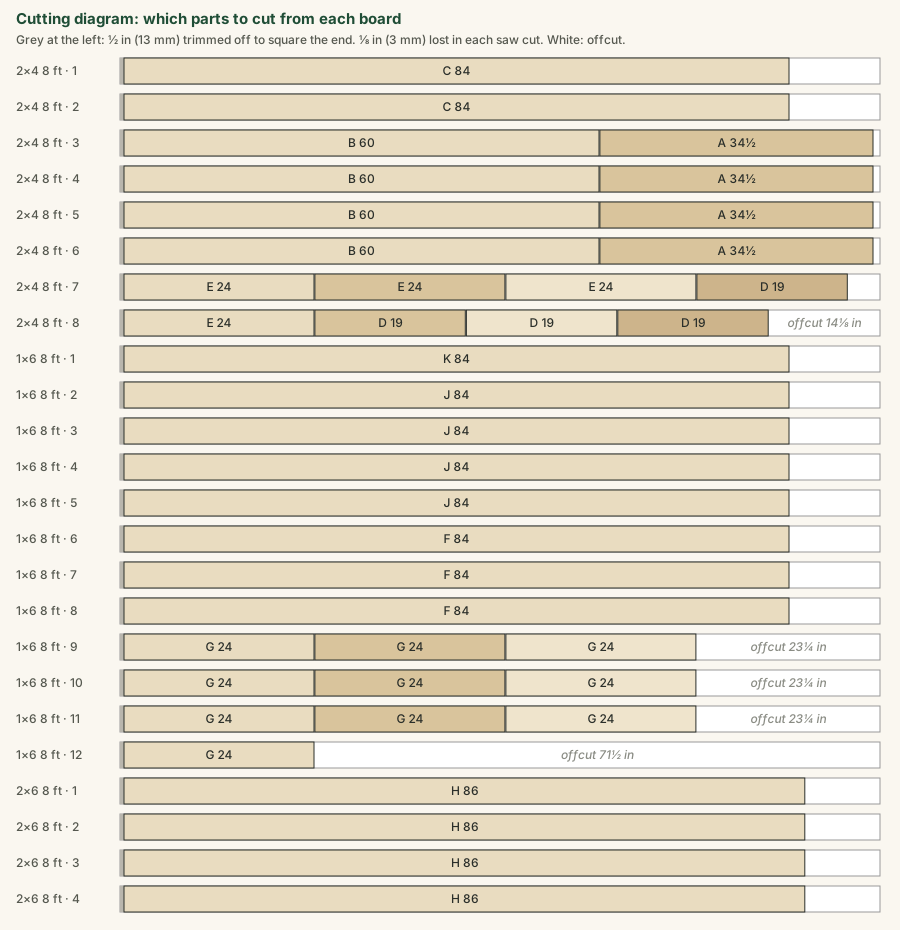
Cut every part square from the cutting diagram: four front legs (A) at 34½ in, four back posts (B) at 60 in, the front and back rail (C) at 84 in, four top cross rails (D) at 19 in, four lower cross rails (E) at 24 in, the 1×6 shelf, back and cap boards (F, J, K) at 84 in, ten end slats (G) at 24 in and the four 2×6 top boards (H) at 86 in. Mark every part with its letter.
Mark the rails for the legs: the left edges of the four front legs (A) and the four back posts (B) sit at 0, 27¾, 54¾ and 82½ in (0, 70, 139 and 210 cm) from the left end, so the end ones are flush with the ends of the 84 in rails. Screw the front rail (C) across the front faces of the legs, its top flush with the leg tops, and the back rail (C) across the front faces of the back posts at the same height. Screw a top cross rail (D) on edge beside each leg, between the front and the back rail: inside the frame at the two ends, and on the right of the two middle legs.
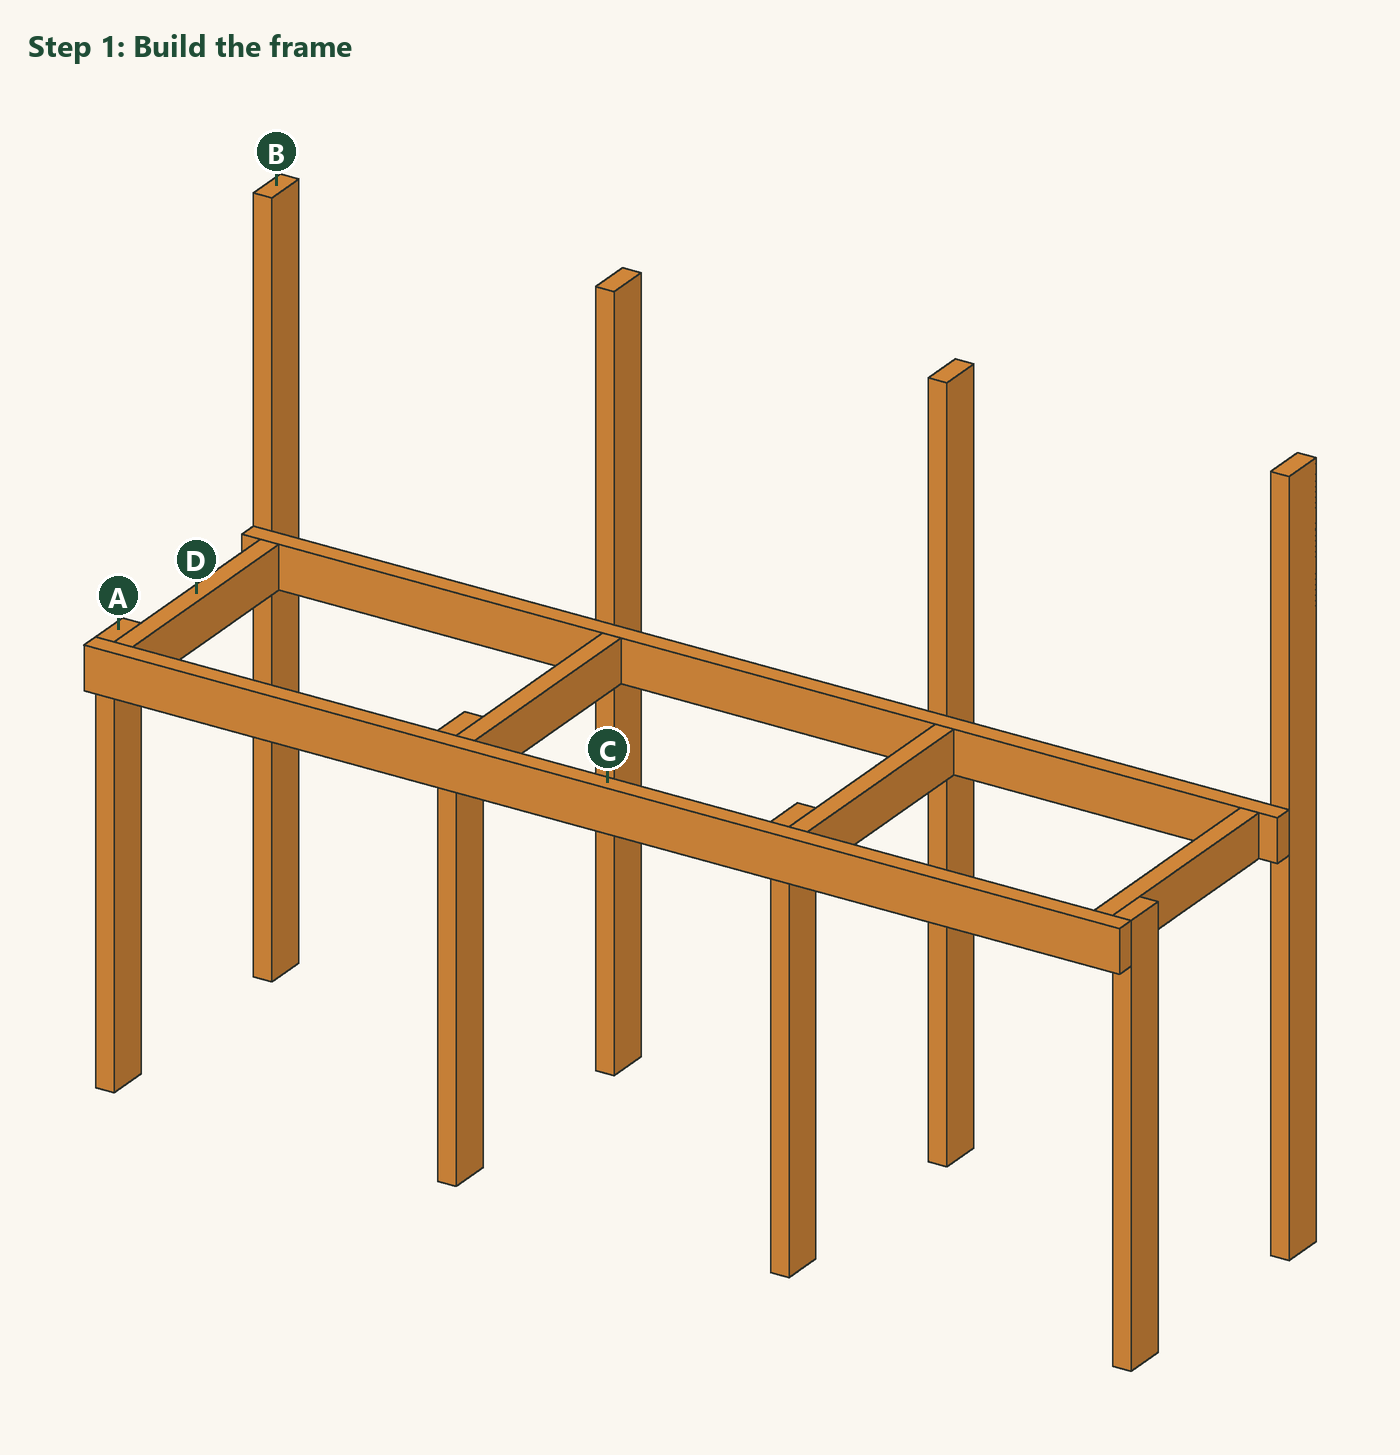
Screw a lower cross rail (E) on edge beside each leg, 4 in (10 cm) above the ground, from the front of the leg to the back of the post. Check that the frame is square by measuring the diagonals, then lay the three shelf boards (F) across the lower cross rails between the legs and the posts and screw them down. Screw five end slats (G) across the outside of each end, from 6 in above the ground up to the top rail, with ¼ in (6 mm) gaps.
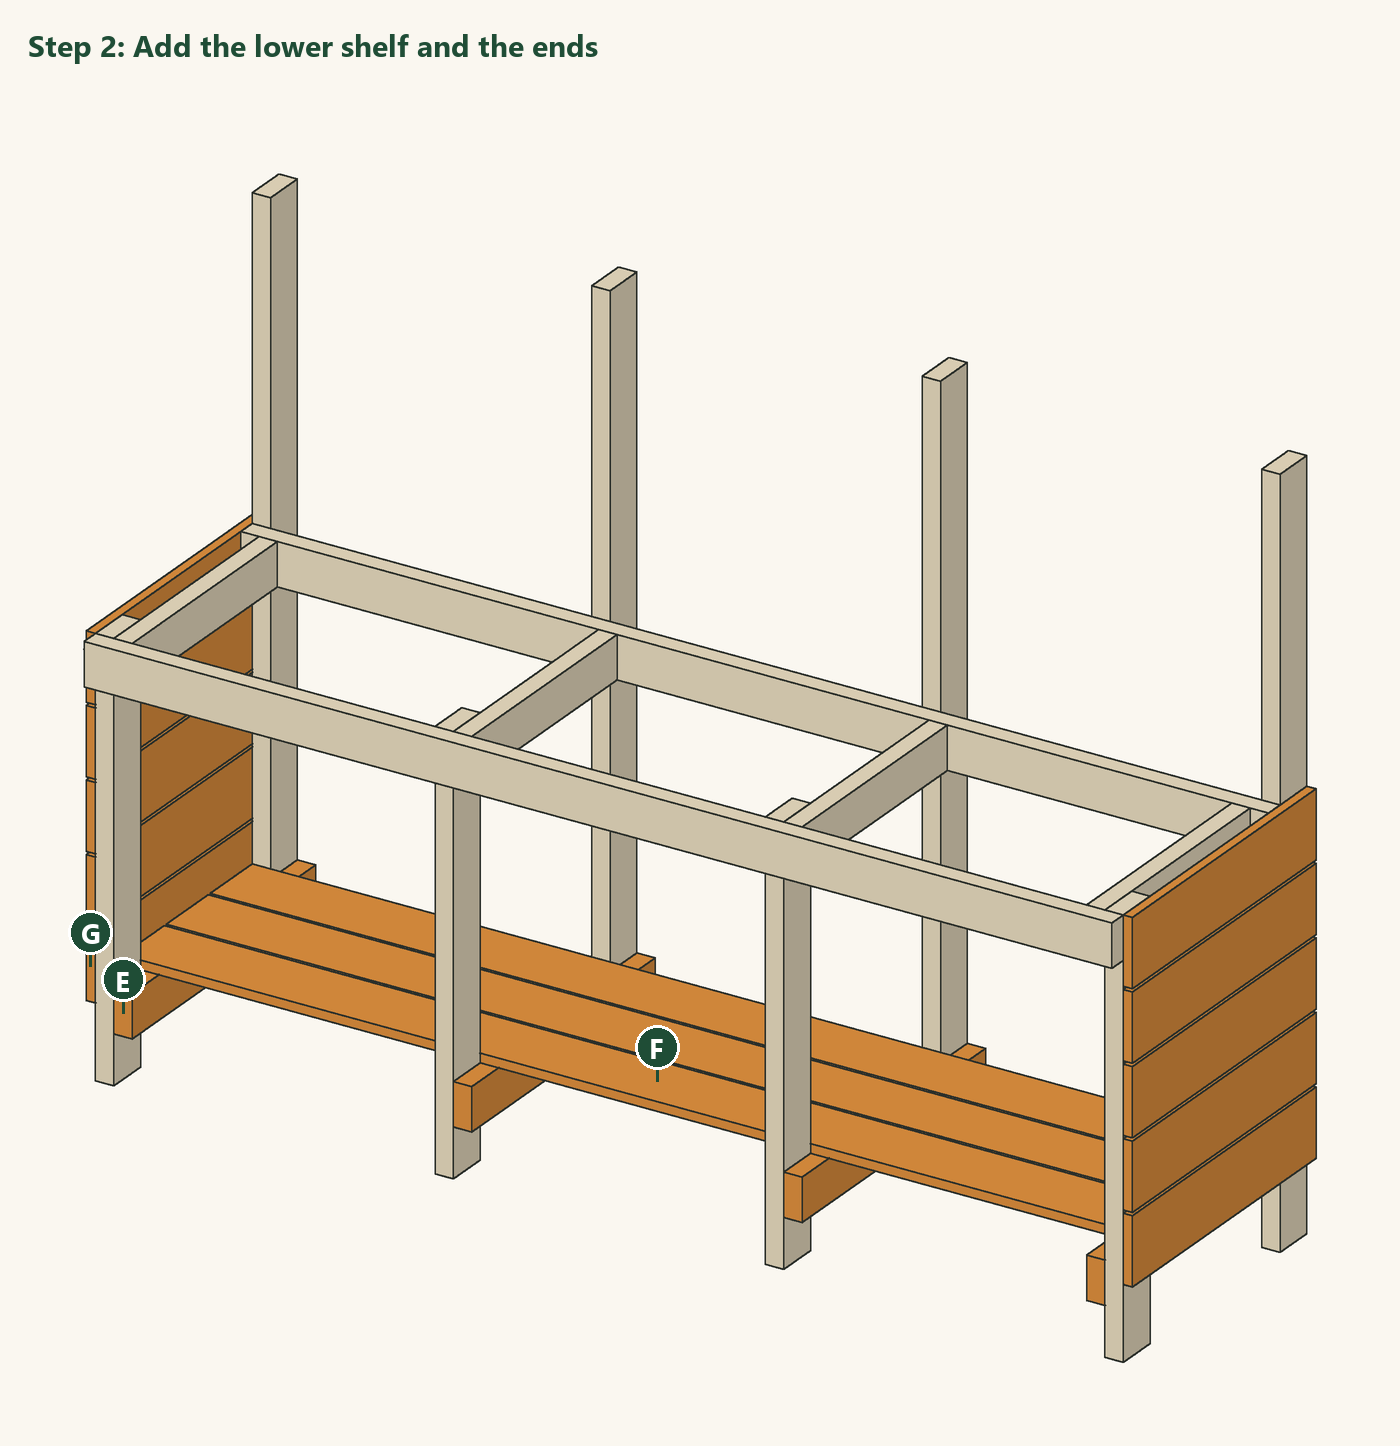
Lay the four top boards (H) on the frame, the back one tight against the back posts, with ¼ in (6 mm) gaps and 1 in (25 mm) overhang at both ends. Pre-drill and screw each board to every cross rail and to the front and back rail with two 3 in screws at each crossing.
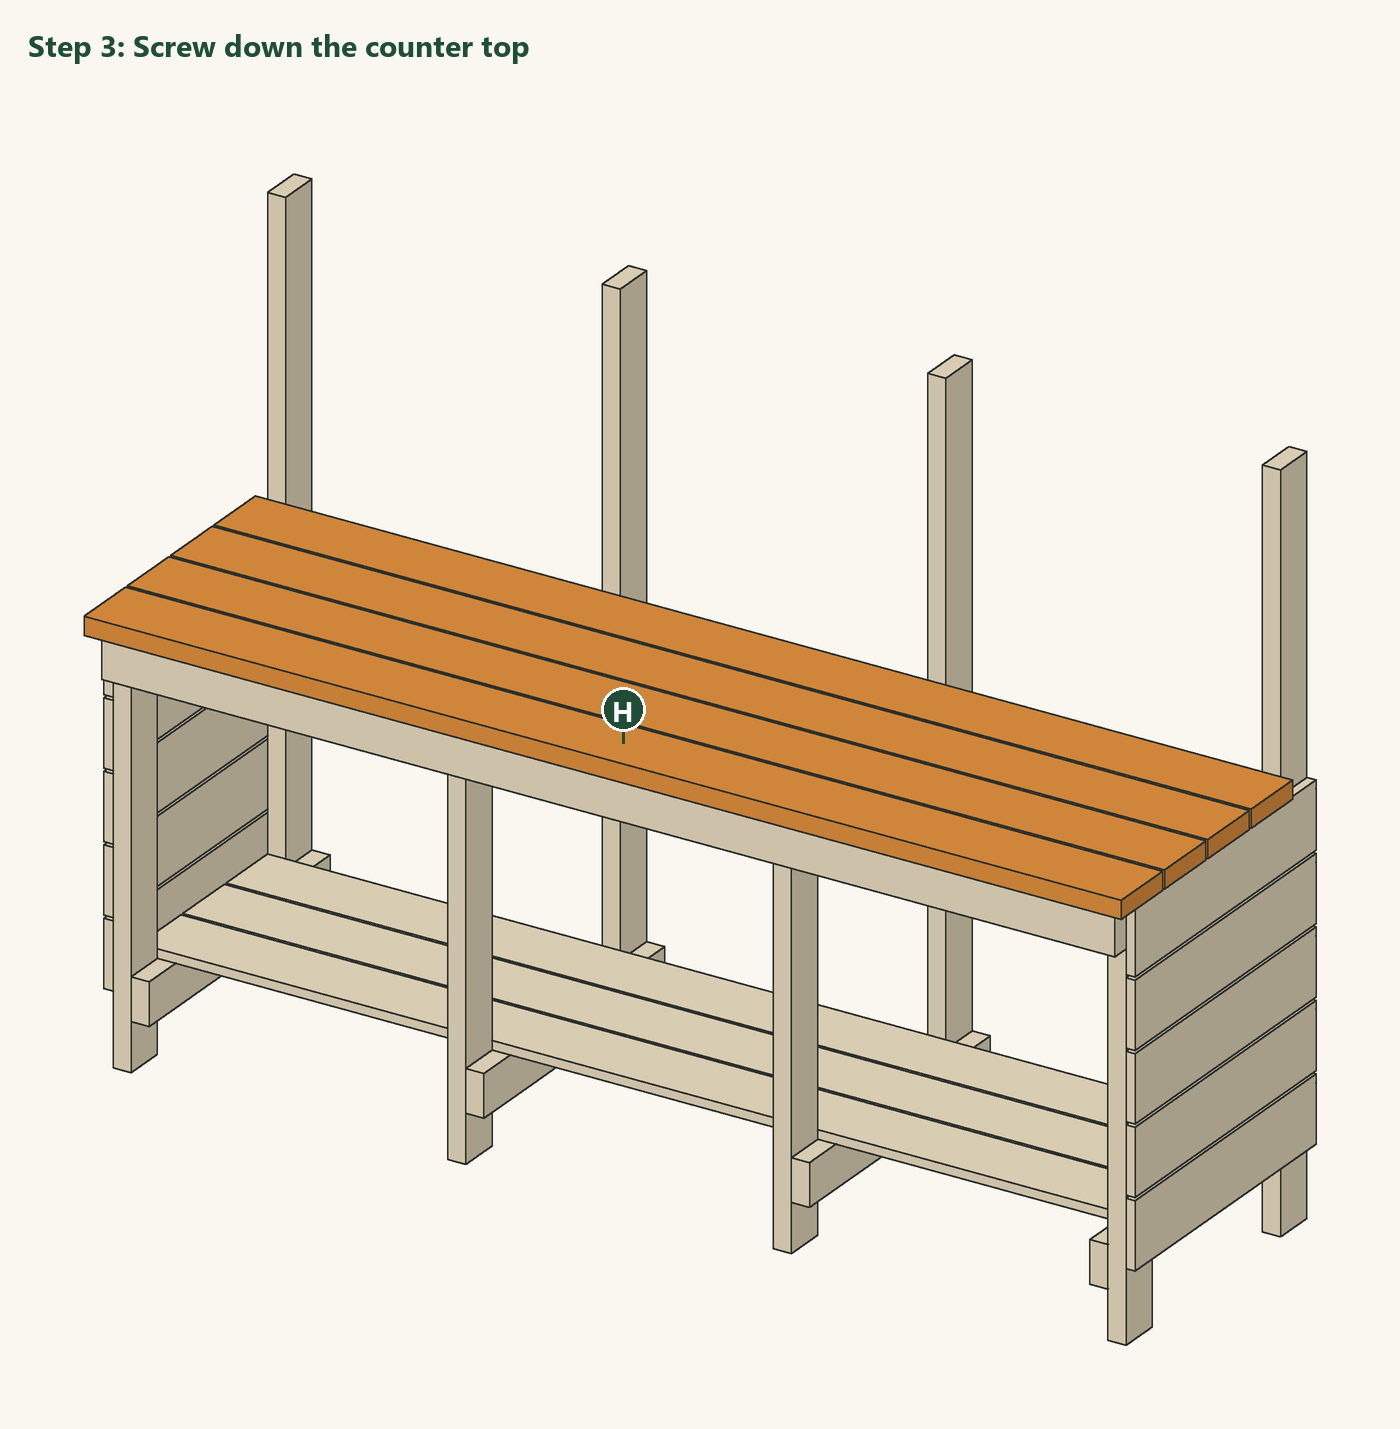
Screw the four back boards (J) across the front faces of the back posts, the lowest one resting on the counter top, with about ⅝ in (17 mm) gaps up to the post tops. Screw the cap shelf (K) on top of the posts, flush with their back faces, so it overhangs the back boards at the front.
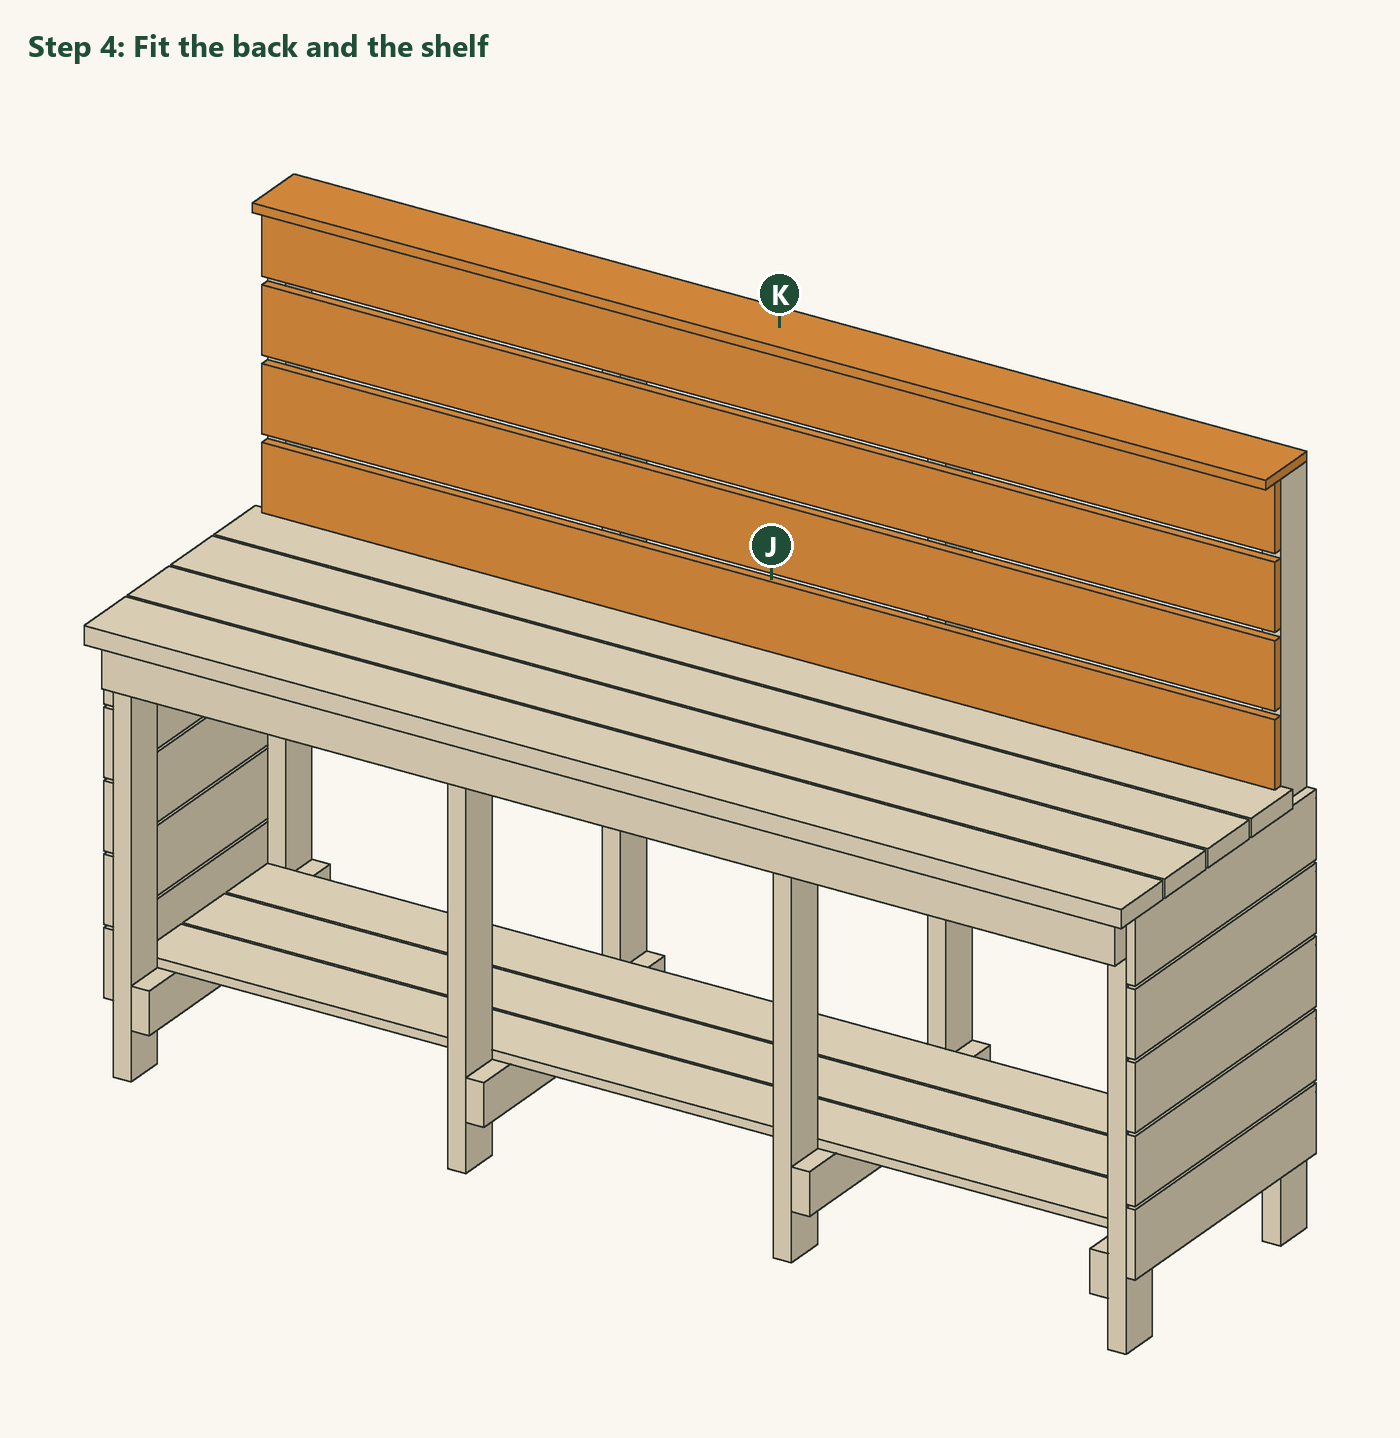
Round over the edges of the top, sand the work surface and oil it with a food-safe oil. Stain or oil the rest. Screw hooks for tongs, towels and tools into the back boards.
The 3D model and drawings of this design, free to download for your own build. Open STEP in Fusion 360, FreeCAD or most CAD programs; STL and OBJ in SketchUp (with an importer), Blender or a 3D viewer; DXF in any 2D CAD program. Units are inches.
About this design: designed and modelled by DIY Outdoor Builds; the text was drafted with AI assistance and checked against the model (see our editorial policy). Design, drawings and 3D files © DIY Outdoor Builds: free to download and build for your own use, please do not republish the files. We have not built this exact design yet.
Building work can be dangerous and may need a permit. Check local rules and use a qualified professional for electrical, gas and structural work.
Share your own version with your photos, measurements and what you changed.
Our designRaised Garden Beds
 Our design
Storage Solutions
 Our design
Other Builds
 Our design
Outdoor Furniture
 Build a Backyard Fire Pit with a Steel Ring InsertOutdoor Kitchens & BBQ · Intermediate · About a day
 Build a Concrete Block Outdoor Kitchen Counter for a GrillOutdoor Kitchens & BBQ · Advanced · A weekend
 Build an Outdoor Grill Prep Station and Side TableOutdoor Kitchens & BBQ · Intermediate · About a day
From diyoutdoorbuilds.com/builds/outdoor-kitchen-counter-2x4 · DIY Outdoor Builds