 Our design
Raised Garden Beds
Our designDesigned by DIY Outdoor Builds and checked board by board in a 3D model built from real lumber sizes. We have not built this one yet, so measure as you go.
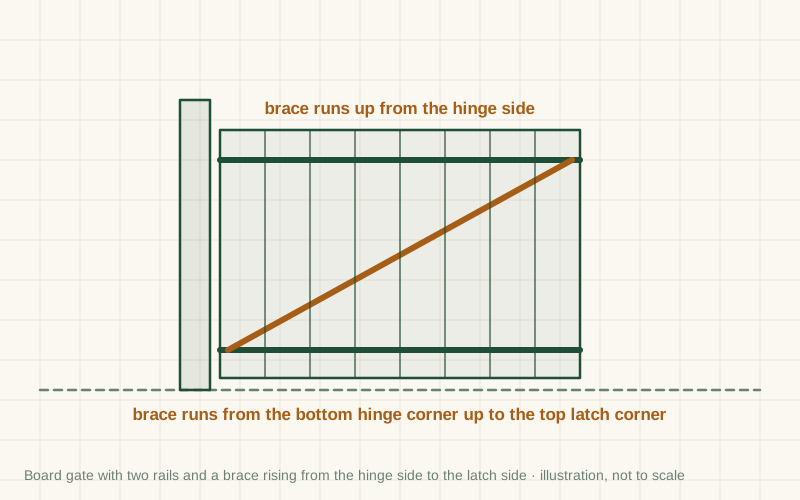
A simple garden gate, 36 in (91 cm) wide and 47 in (1.19 m) high: six vertical 1×6 boards screwed to two 2×4 rails, with a diagonal 2×4 brace between the rails that keeps the gate square. It is the classic Z-gate, and it suits a picket fence, a hedge opening or a vegetable garden.
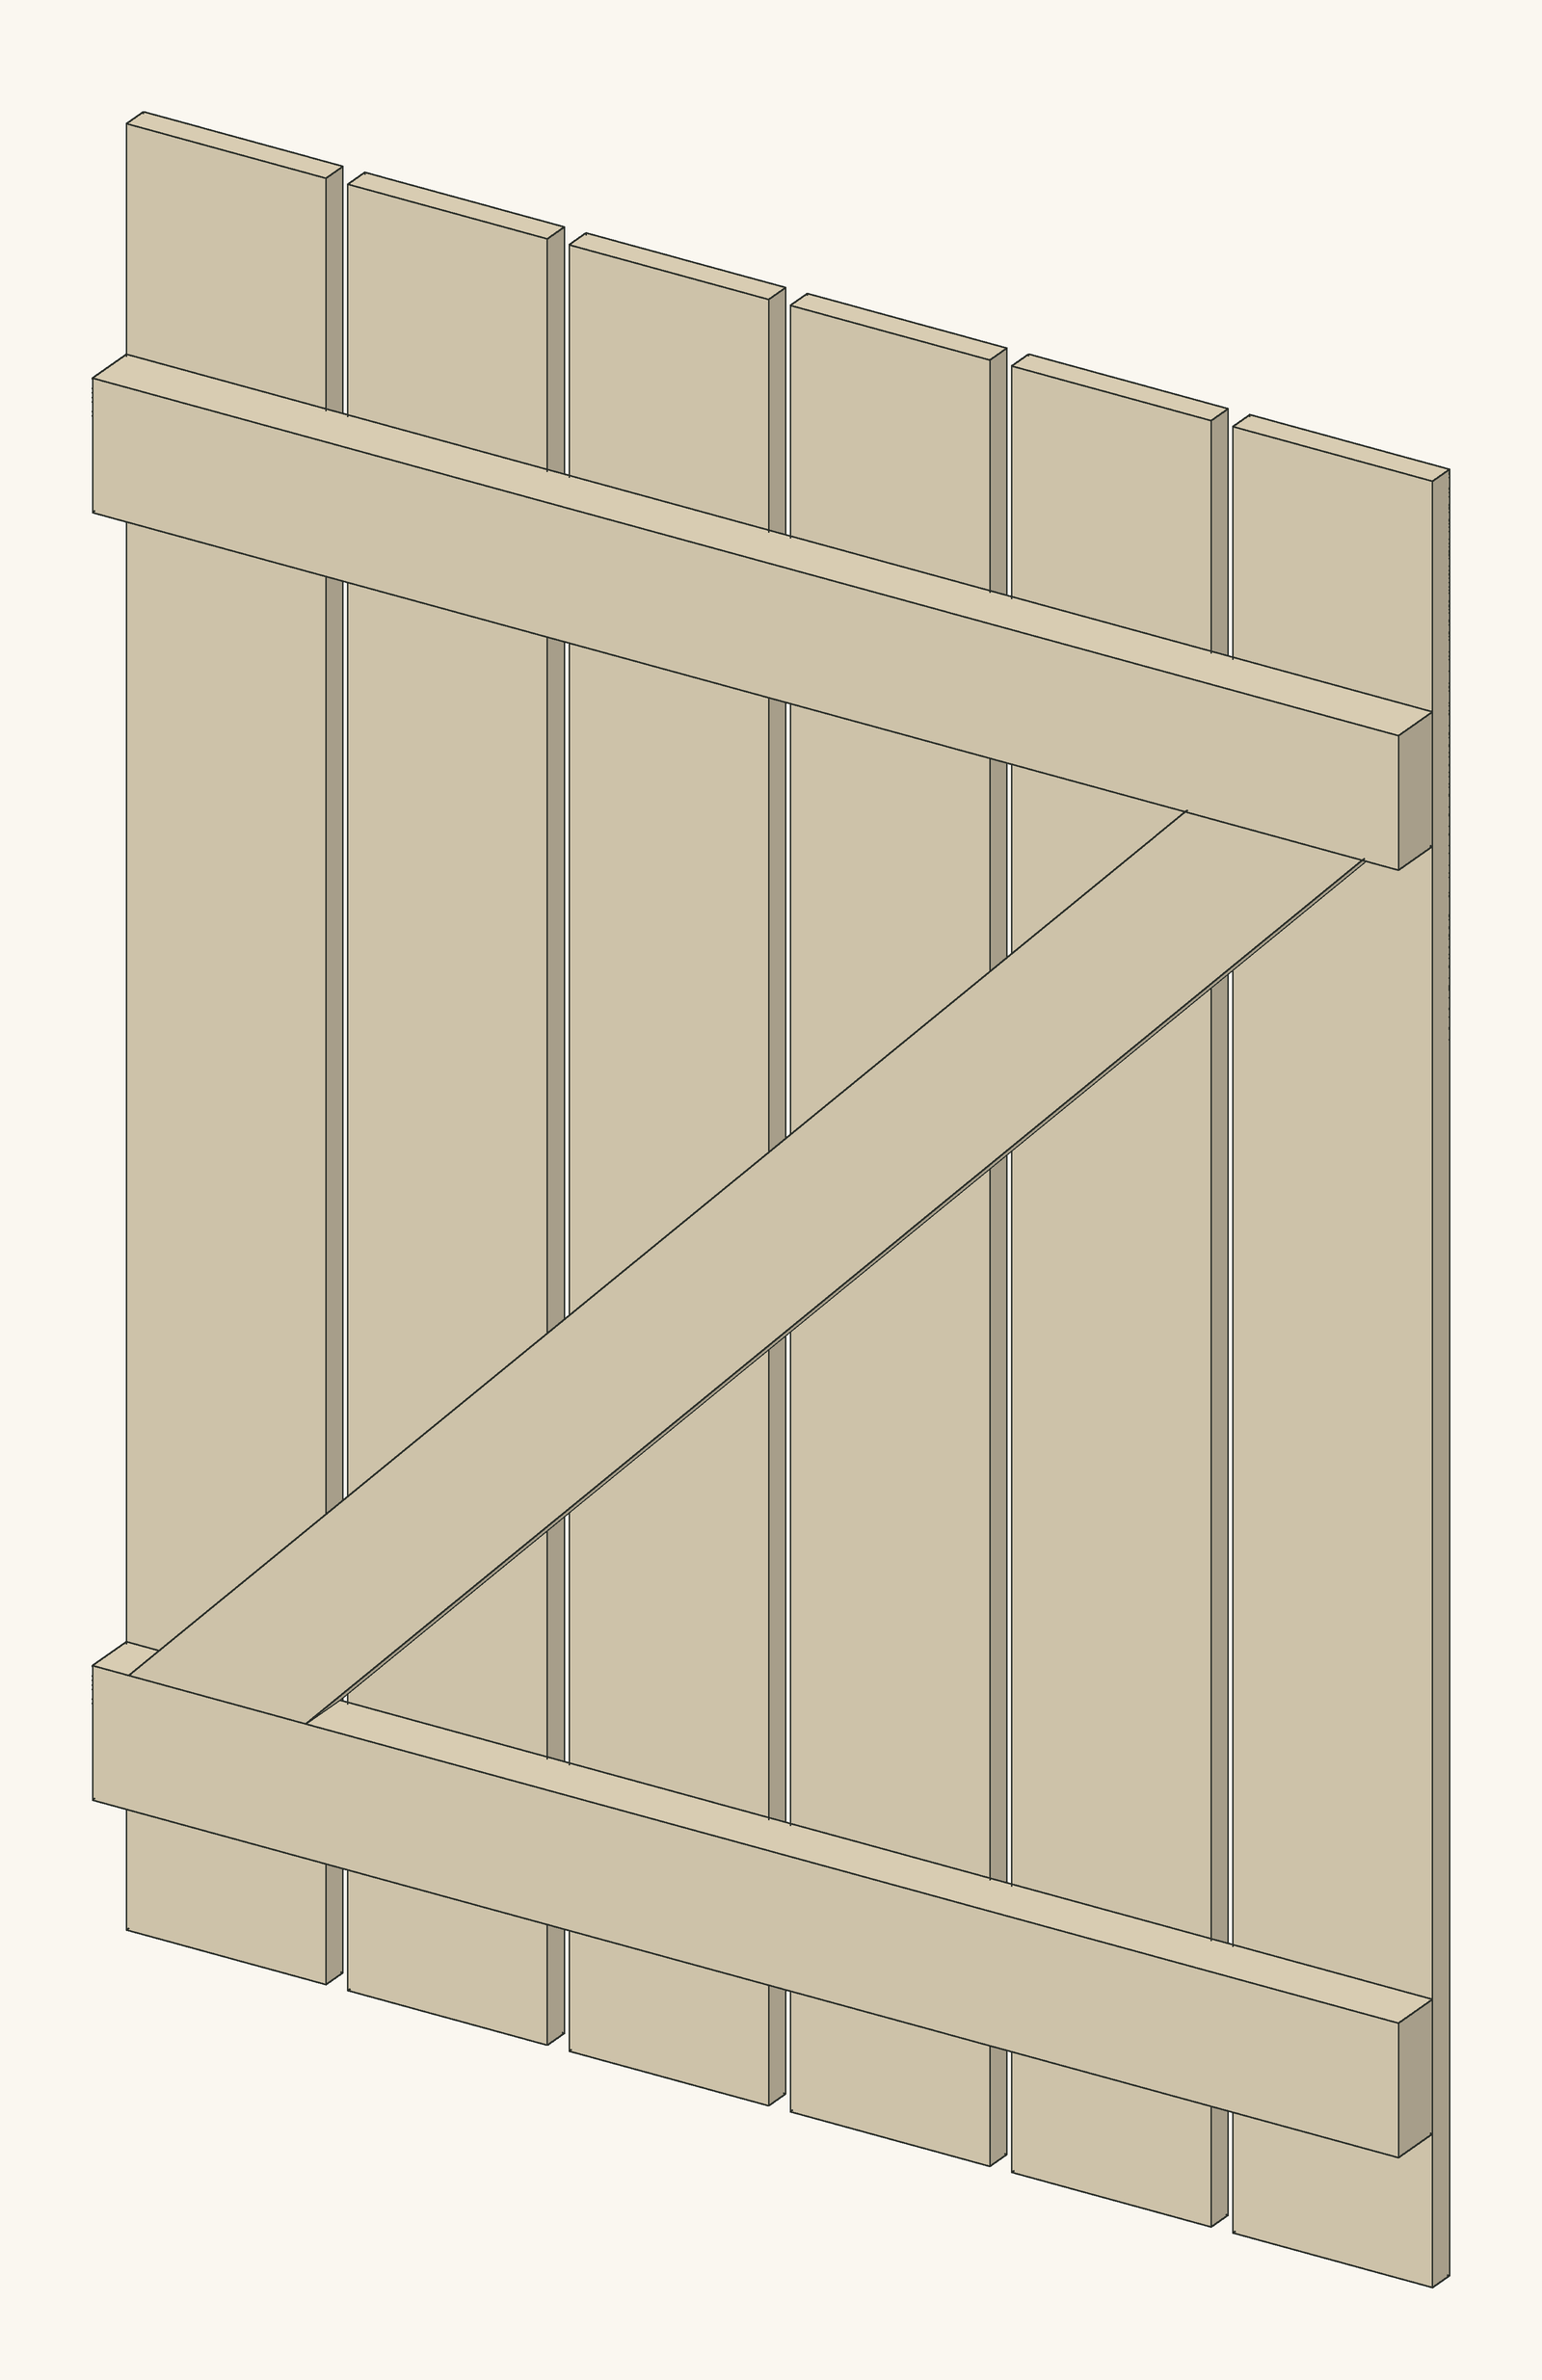
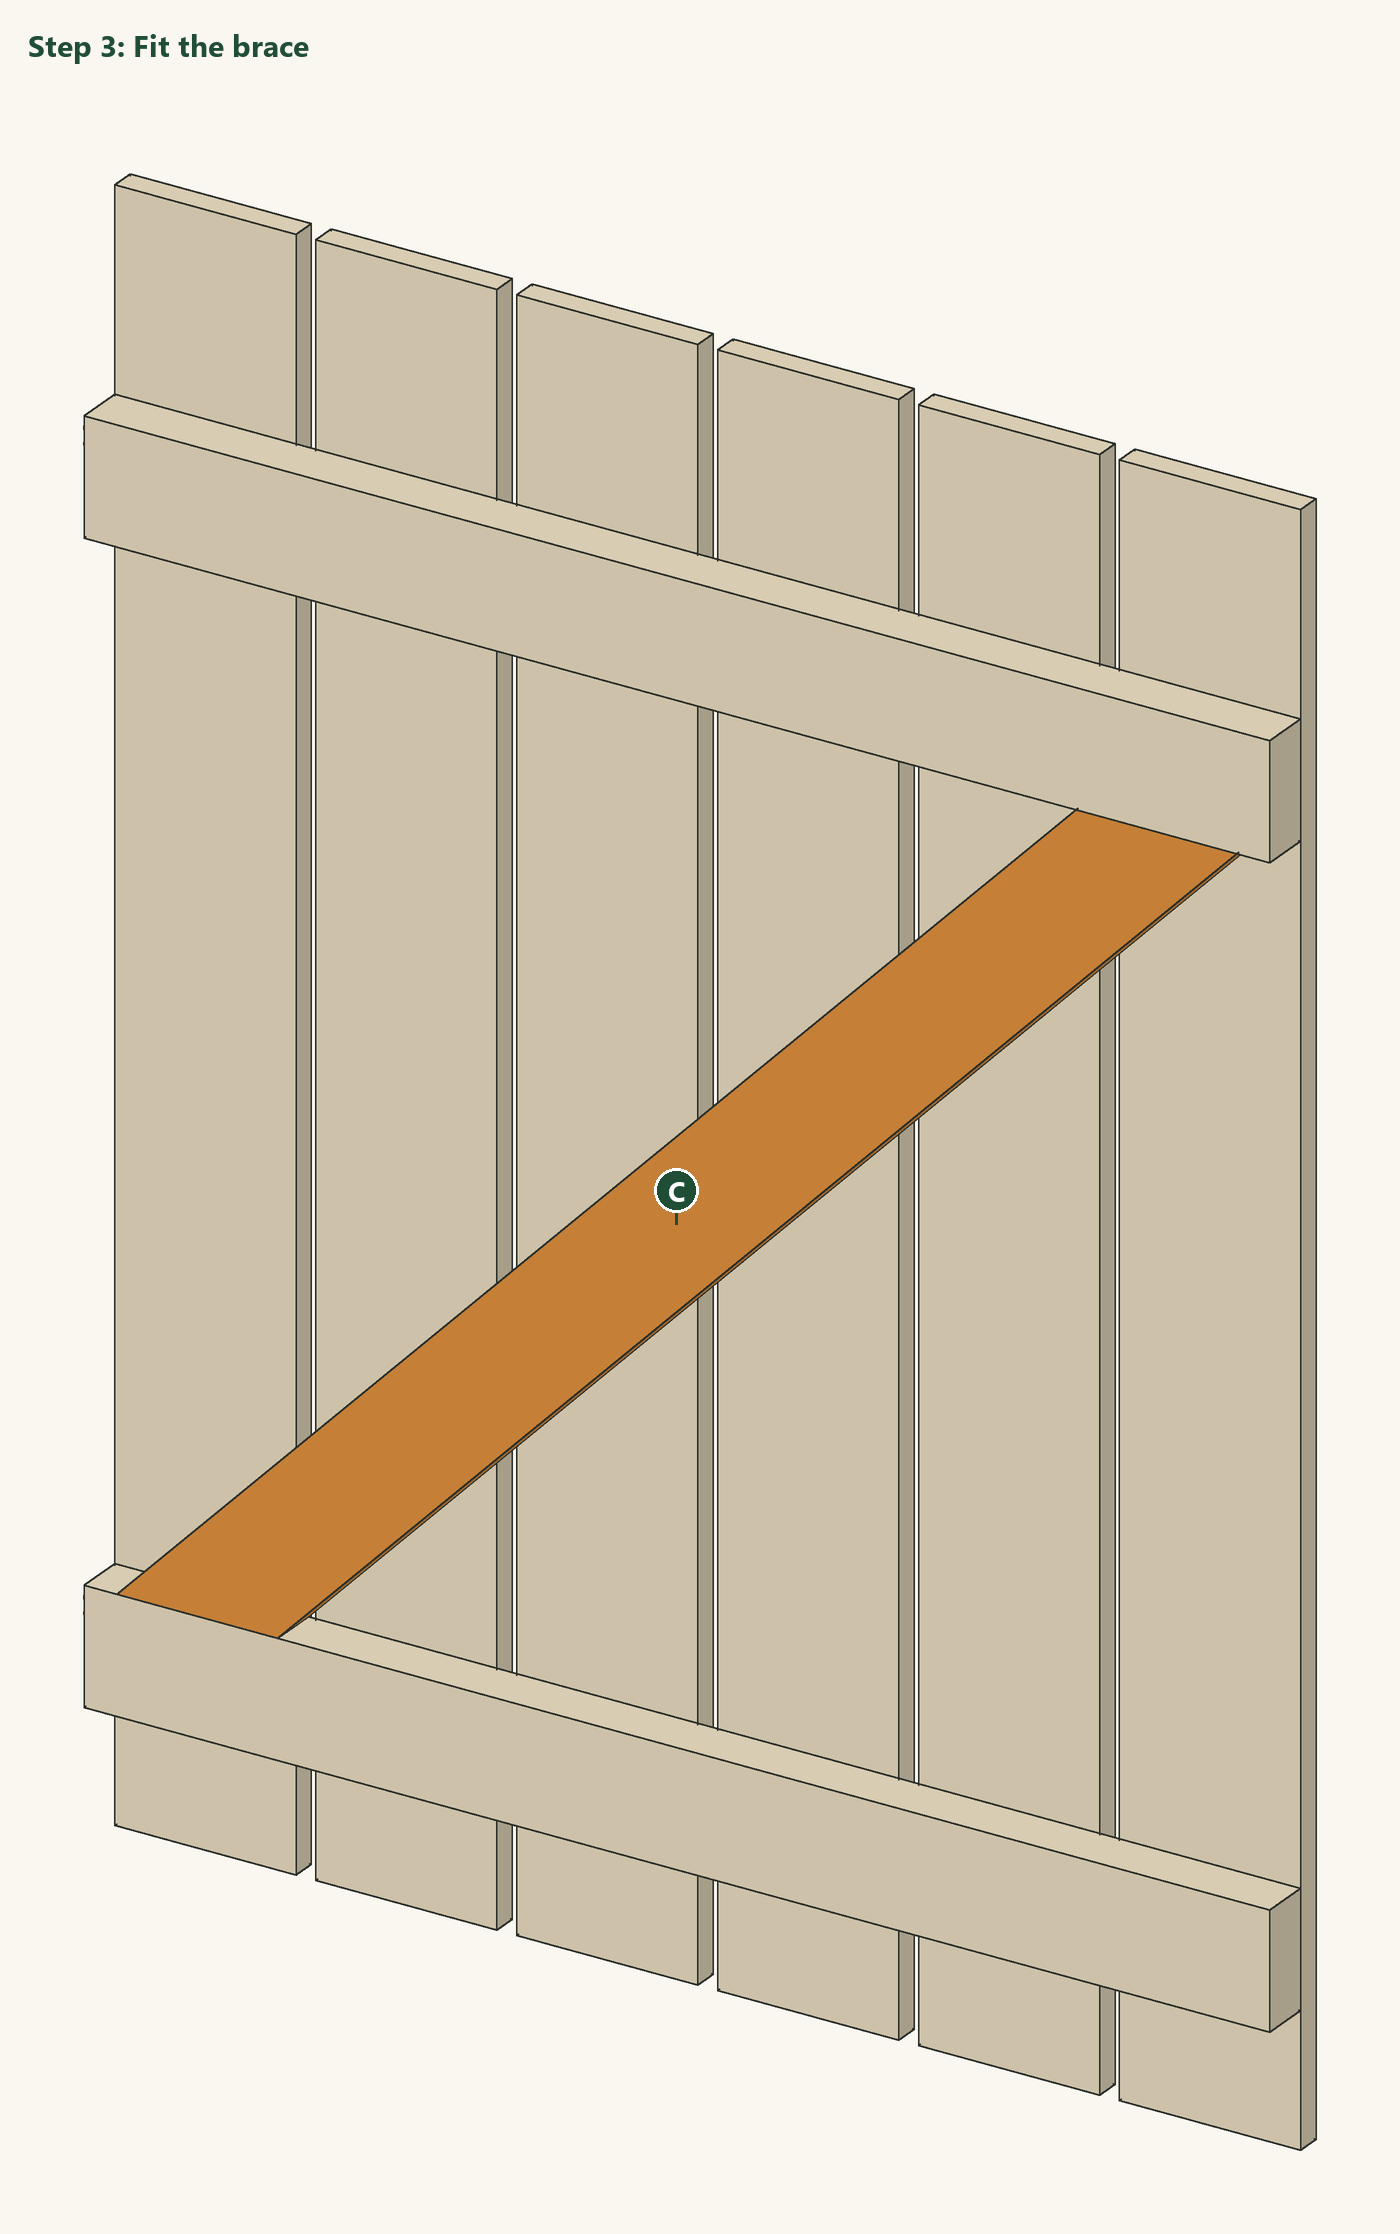
Most gates fail the same way: the latch side slowly drops until the gate drags on the ground. The cure is a diagonal brace, set the right way round. On this gate the brace runs from the bottom rail on the hinge side up to the top rail on the latch side. The weight of the latch side then pushes along the brace towards the bottom hinge, and wood is very strong in compression, so the gate stays square for years. Set the brace the other way and it does nothing.
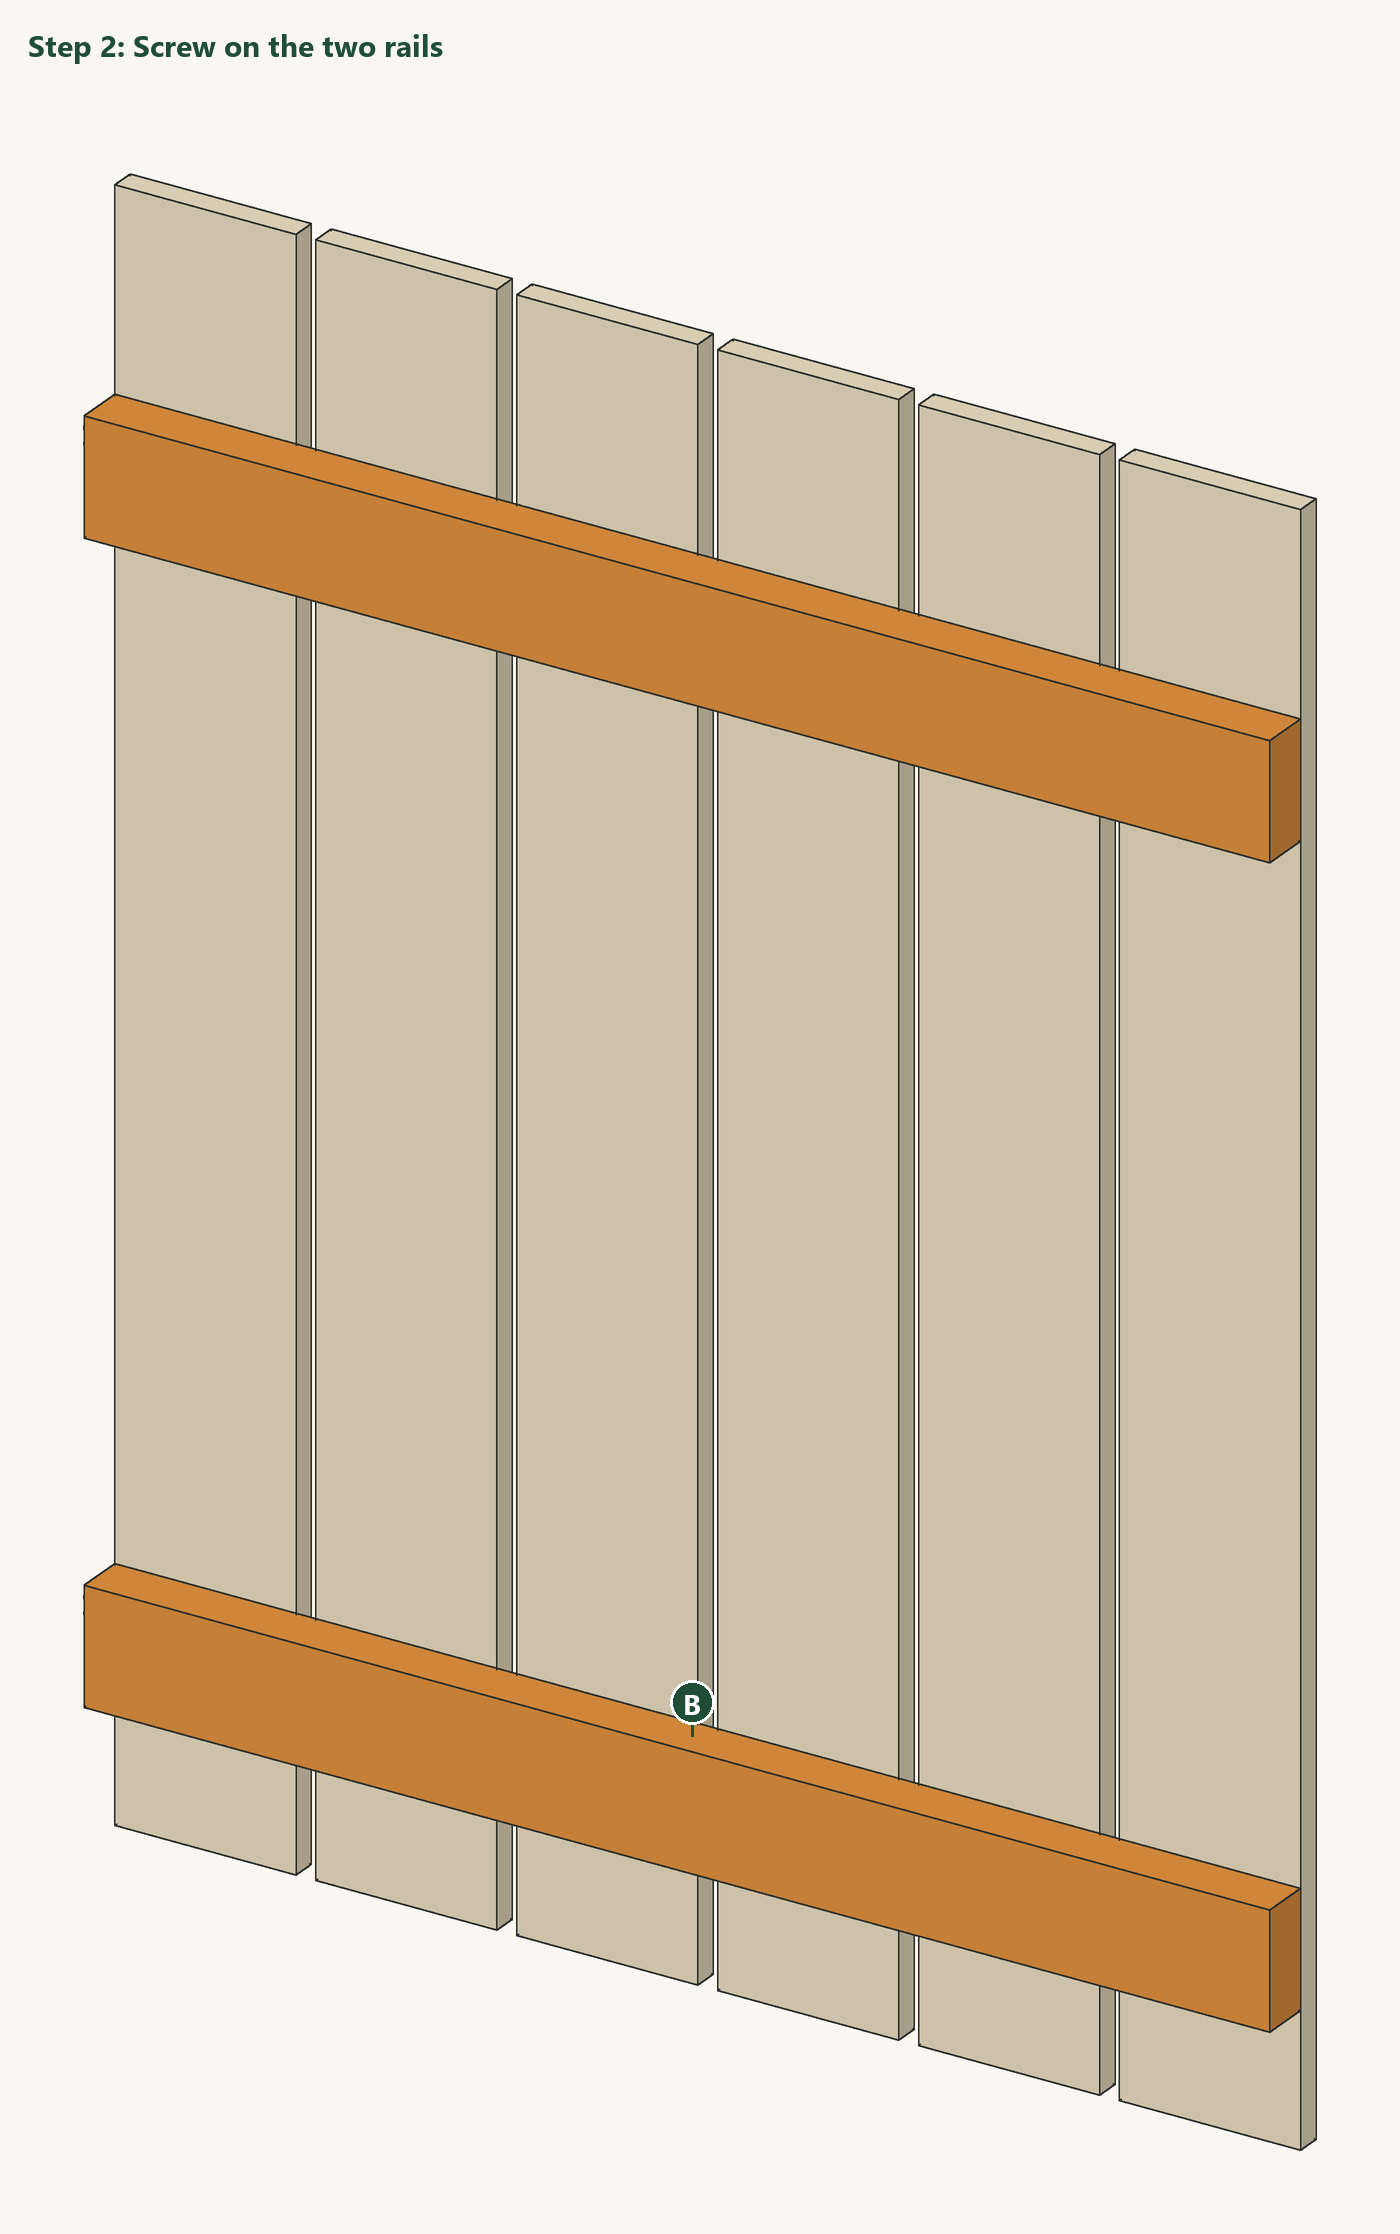
The gate is made of six 1×6 boards standing on end with gaps of about ⅝ in (15 mm), screwed to two 2×4 rails laid flat across the back, 4 in (10 cm) from the bottom and 6 in (15 cm) from the top. The brace fits between the rails at about 44°, with both ends cut level so it bears fully on the rails. The rails run the full width so the hinges and the latch can be screwed into solid 2×4.
The gate is 47 in high so two boards come out of every 8 ft board. It fits an opening of about 36½ in (93 cm) between posts, which leaves a gap of about ¼ in (6 mm) on each side for the hinges and for the wood to swell in wet weather. If your opening is wider or narrower, change the number of boards or the size of the gaps and cut the rails to match; the brace angle changes with it.
We designed it as a 3D model using real lumber sizes and a script checked that no two boards overlap, that every board touches and can be fixed to another, and that each board in the model is exactly the size in the cut list. The cut list, the cutting diagram and the step drawings on this page all come from that same model, so they cannot disagree. We have not built this exact design ourselves yet, so measure your real boards as you go: lumber varies slightly in width and thickness.
| Item | Qty | Notes |
|---|---|---|
| 1×6 boards, 8 ft (2.4 m), pressure-treated or cedar | 3 | Two 47 in gate boards from each |
| 2×4 boards, 8 ft (2.4 m), pressure-treated | 2 | Two rails and the brace |
| Exterior screws 1⅝ in (41 mm) | About 40 | Two at every crossing of a board and a rail or the brace |
| Strap or T-hinges, 12 in (30 cm) | 2 | Heavy-duty, galvanised or black powder-coated |
| Gate latch | 1 | Thumb latch or gravity latch |
| Part | Qty | Length | Section | Notes |
|---|---|---|---|---|
| A · Gate board | 6 | 47 in (1194 mm) | 1×6 (¾ × 5½ in / 19 × 140 mm) | Pressure-treated or cedar |
| B · Rail | 2 | 36 in (914 mm) | 2×4 (1½ × 3½ in / 38 × 89 mm) | Pressure-treated or cedar |
| C · Brace | 1 | 41⅞ in (1062 mm) | 2×4 (1½ × 3½ in / 38 × 89 mm) | Pressure-treated or cedar. Both ends cut level at 44.1° from square, parallel; length is the long edge |
The cut list comes straight from the 3D model, which is checked so that no two boards overlap, every board is joined to another and every board is exactly the length listed. Measure the real gaps before cutting the parts that fit between others.
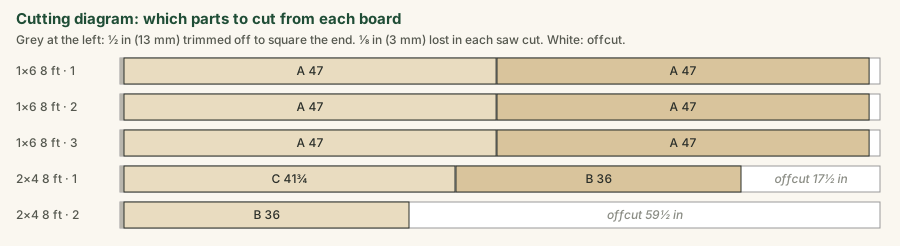
Measure the opening between the posts at the top and at the bottom. The gate should be about ½ in (12 mm) narrower than the smaller measurement. Then cut six gate boards (A, 47 in) and two rails (B, 36 in). Cut the brace (C) last, after the rails are on, so it fits exactly.
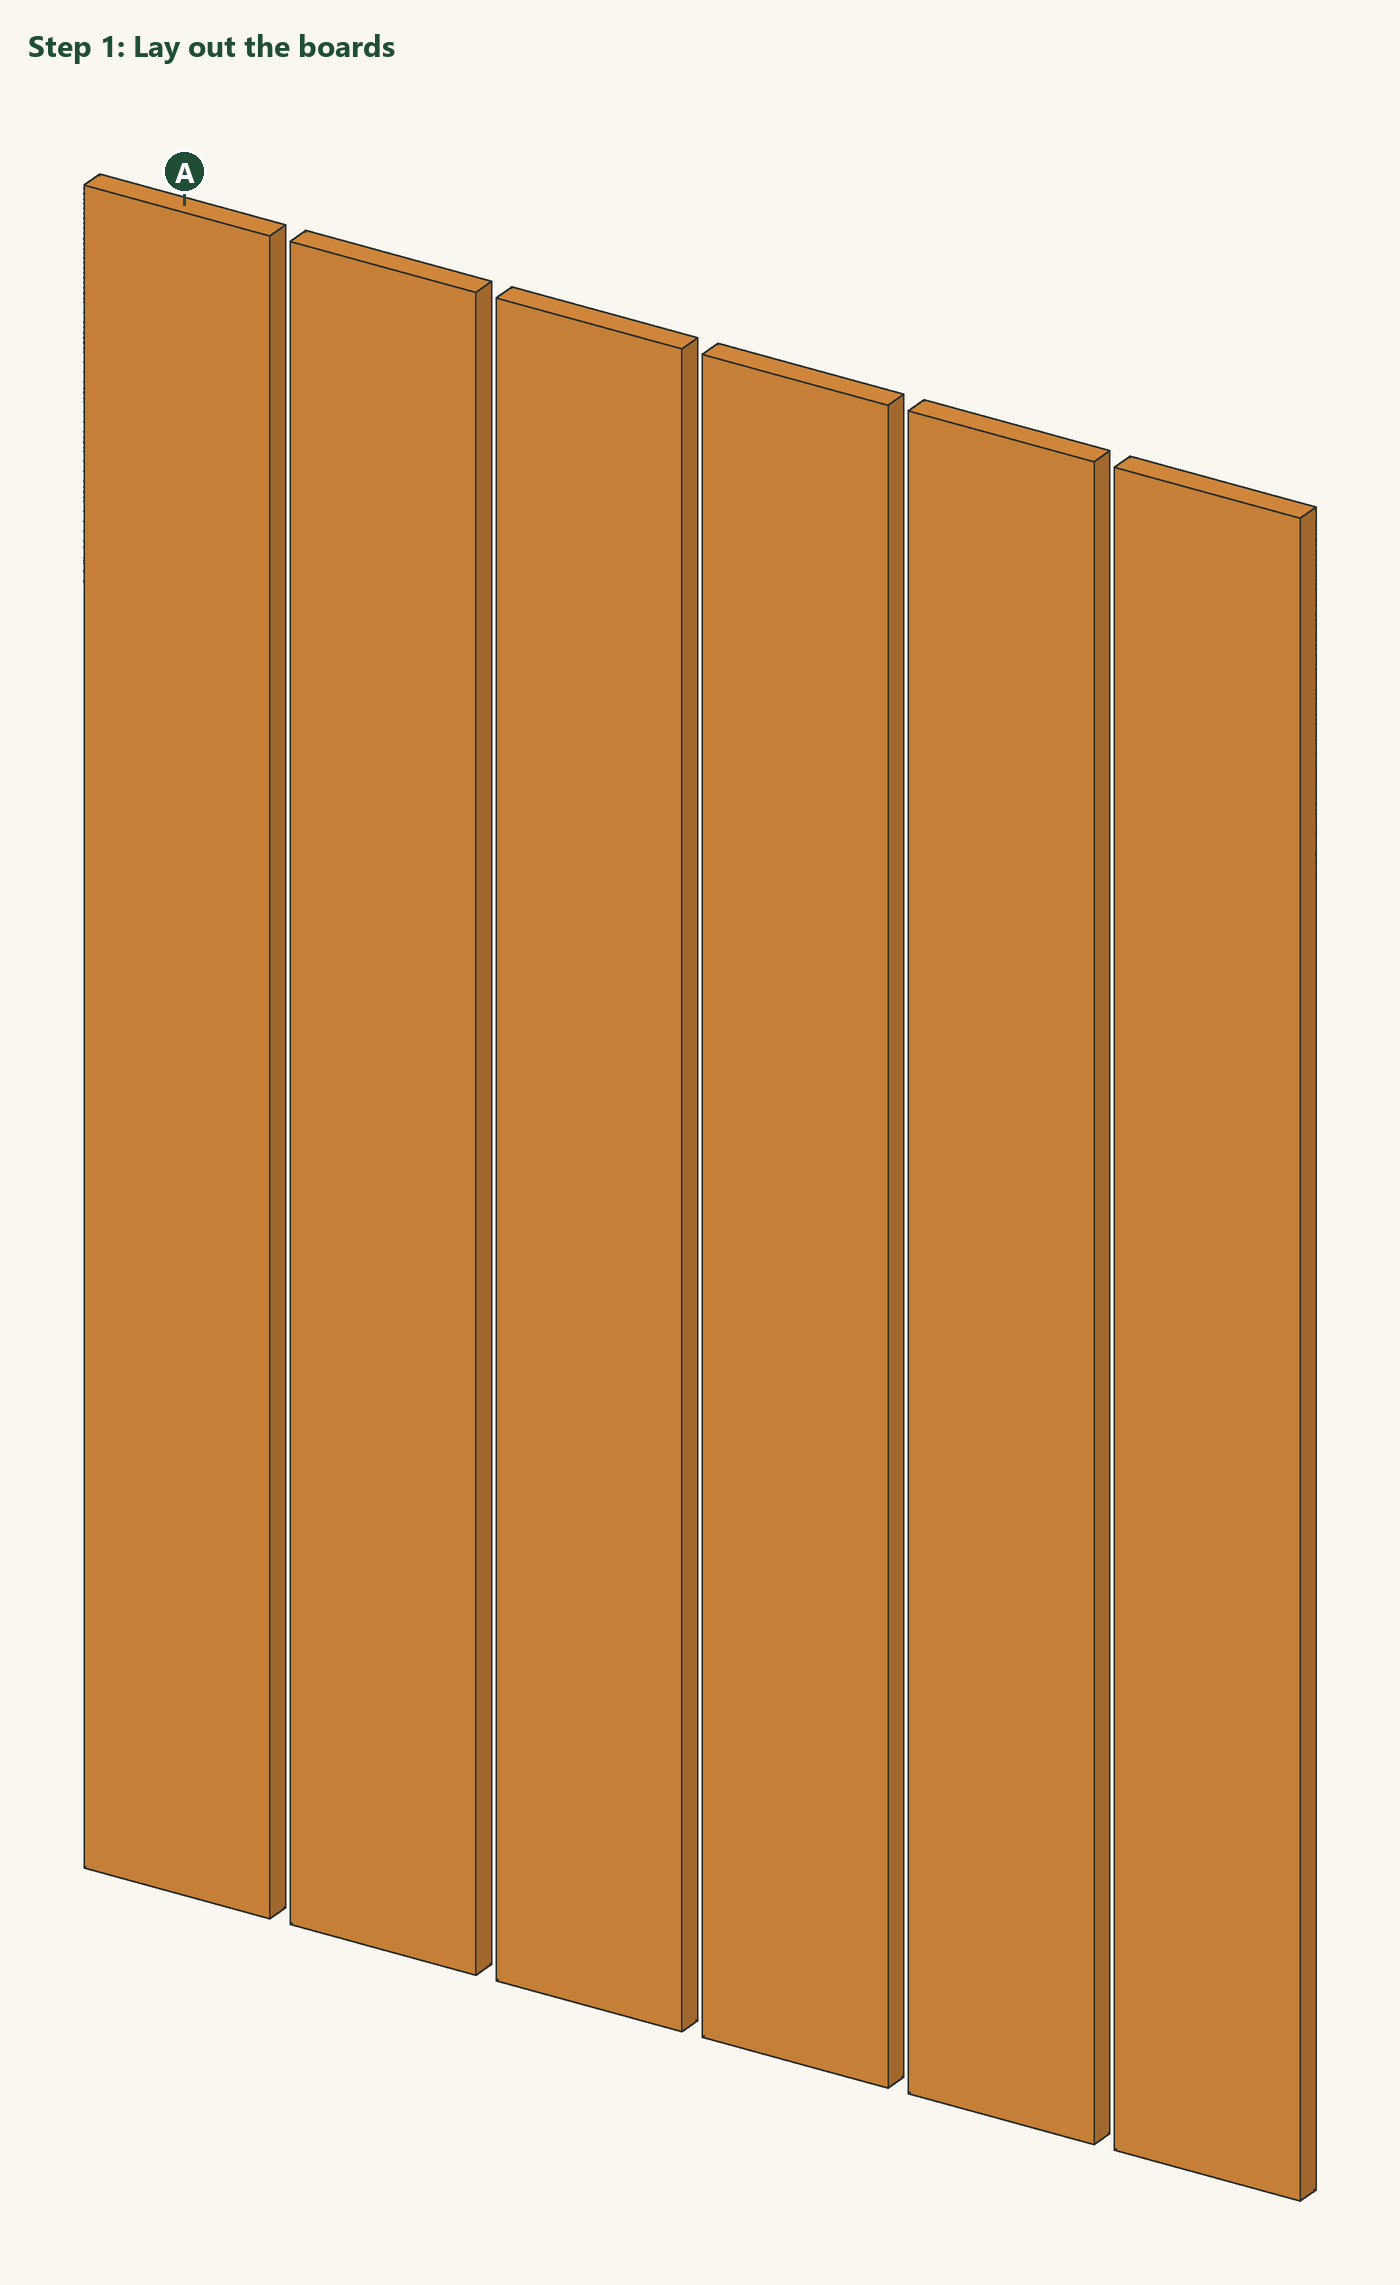
Lay the six boards face down on a flat surface, ends aligned against a straight board, with spacers of about ⅝ in (15 mm) between them. Check that the whole panel is 36 in wide and square by measuring the diagonals.
Lay the rails (B) flat across the boards, the bottom one 4 in (10 cm) from the bottom ends and the top one 6 in (15 cm) from the top ends, flush with both outer boards. Screw through each board into each rail with two screws, from the board side so the screws do not show on the front.
Decide which side the hinges go on. Lay a 2×4 on the gate from the bottom rail on the hinge side to the top rail on the latch side, about 1 in from each edge, and mark where it crosses the edges of the rails. Cut both ends on those lines; they are parallel cuts of about 44° from square, and the long edge is about 41¾ in (1.06 m). Tap the brace in tight between the rails and screw through each board into it.
Screw the hinges to the rails on the hinge side, then hold the gate in the opening on blocks so it is about 2 in (5 cm) above the ground and level, and screw the hinges to the post. Fit the latch on the other side at a height that is easy to reach over the gate, if you want to open it from both sides.
The 3D model and drawings of this design, free to download for your own build. Open STEP in Fusion 360, FreeCAD or most CAD programs; STL and OBJ in SketchUp (with an importer), Blender or a 3D viewer; DXF in any 2D CAD program. Units are inches.
About this design: designed and modelled by DIY Outdoor Builds; the text was drafted with AI assistance and checked against the model (see our editorial policy). Design, drawings and 3D files © DIY Outdoor Builds: free to download and build for your own use, please do not republish the files. We have not built this exact design yet.
Building work can be dangerous and may need a permit. Check local rules and use a qualified professional for electrical, gas and structural work.
Share your own version with your photos, measurements and what you changed.
Our designRaised Garden Beds
 Our design
Compost Bins
 Open design
Raised Garden Beds
 Member project
Raised Garden Beds
 4×8 Raised Garden Bed: Cut List, Soil Needed and Build StepsRaised Garden Beds · Beginner · A few hours
 Build a Stone Herb Spiral for a Small GardenGarden Layouts · Intermediate · About a day
 Build a Wooden Z-Brace Garden GateFences & Gates · Beginner · About a day
 Build an Elevated Planter Box on Legs (Waist-High Garden)Raised Garden Beds · Intermediate · About a day
From diyoutdoorbuilds.com/builds/garden-gate-z-brace-1x6 · DIY Outdoor Builds