 Guide
Fences & Gates
GuideStep-by-step plan written by our editors, with materials, tools and every step in order.
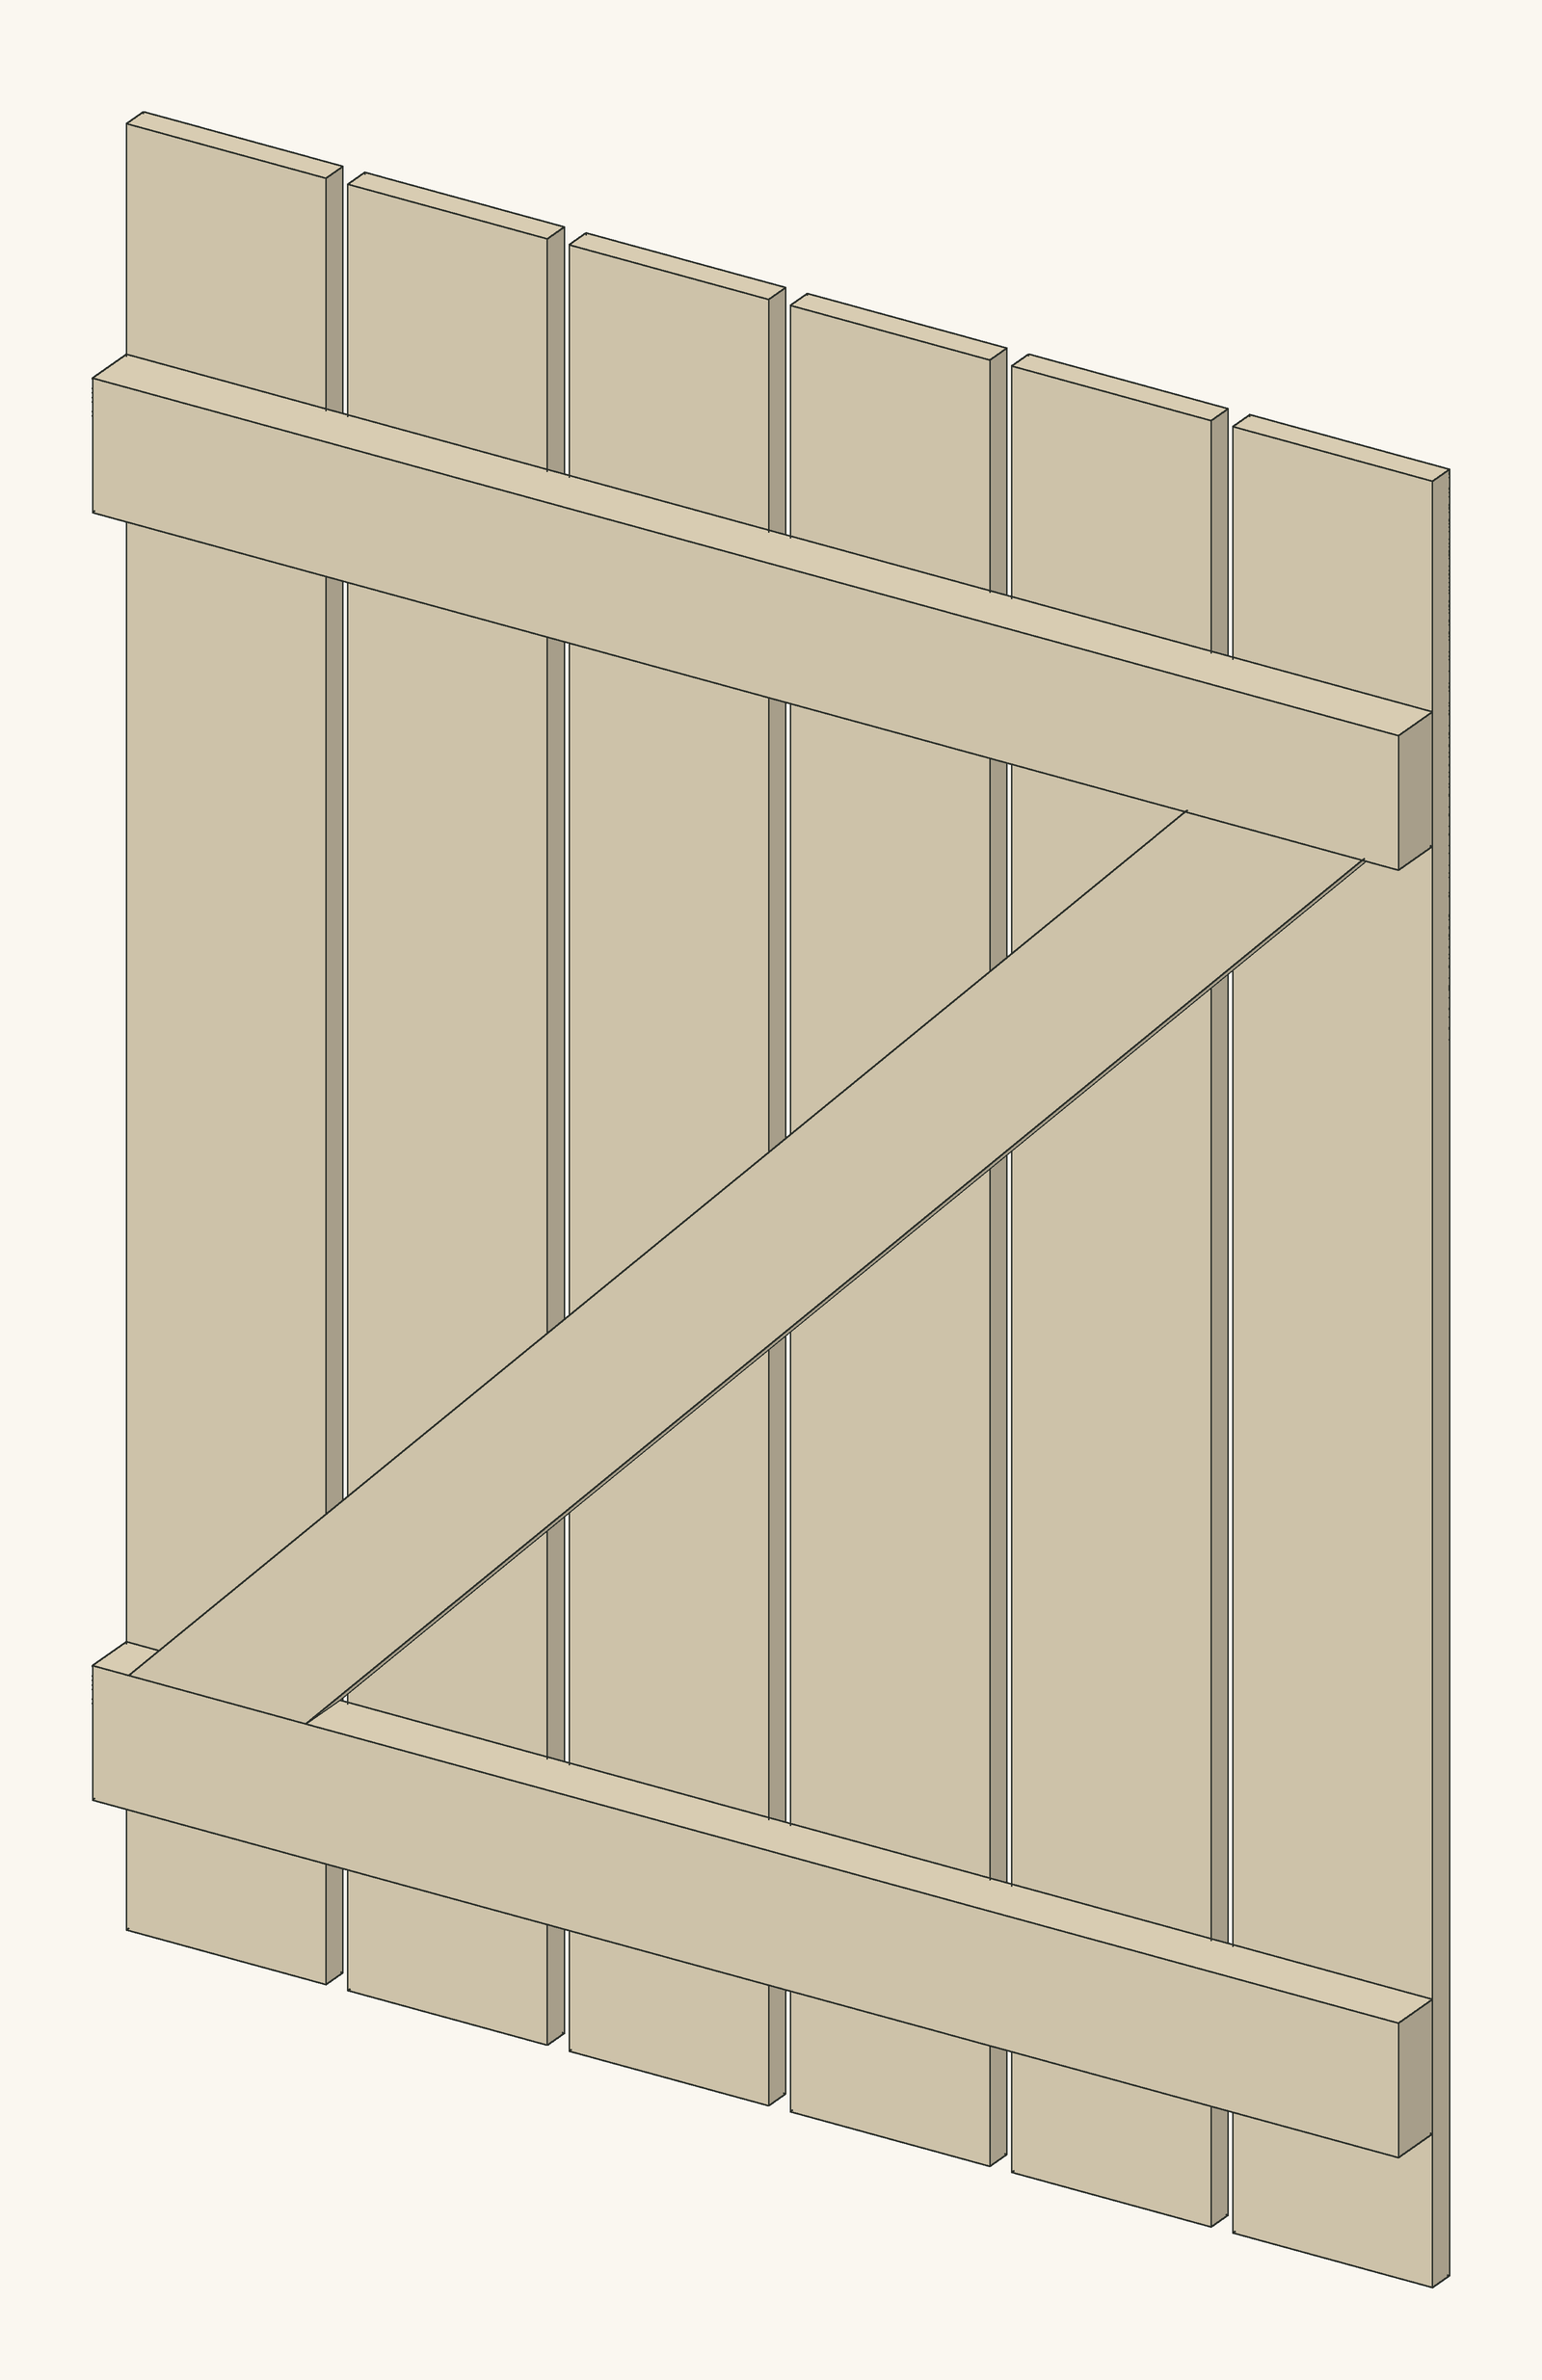
A ledged and braced gate, often called a Z-brace gate, is the simplest wooden gate that stays square for years. Vertical boards are held by two horizontal rails, and a diagonal brace between them stops the latch side from dropping. This one fits a 36 in (91 cm) opening and suits a garden or picket fence.
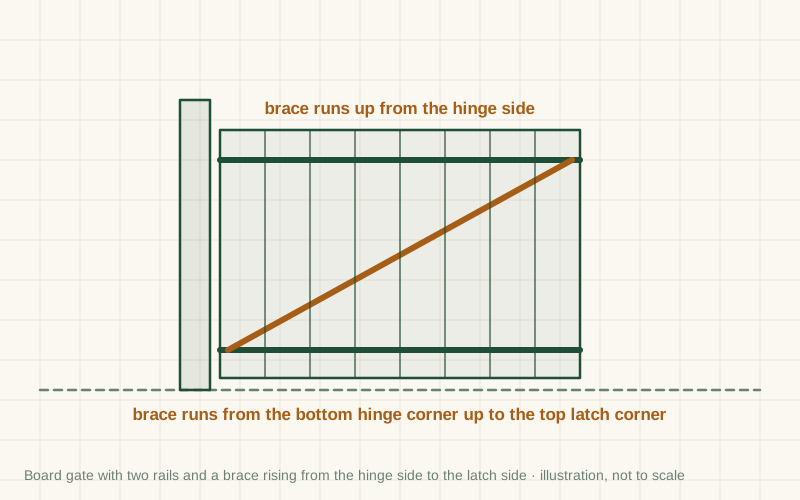
You will measure the opening, cut six boards and two rails, lay the boards face down with even gaps, screw the rails across them, then fit a diagonal brace that runs from the bottom rail on the hinge side up to the top rail on the latch side. The gate is hung on strap or T-hinges and closed with a thumb latch or gravity latch.
The direction of the brace is the one thing that must be right. Running from the low hinge corner up to the high latch corner, the brace is pushed in compression by the weight of the gate and props the latch side up. Fitted the other way, it does almost nothing and the gate sags.
Build it
Lumber sizes are North American nominal sizes: a 2×4 is actually 1½ × 3½ in (38 × 89 mm). Metric figures in brackets are converted or, for lumber, the nearest common European size (such as 45 × 95 mm), which works the same way.
| Part | Qty | Length | Section | Notes |
|---|---|---|---|---|
| Vertical boards | 6 | 48 in (1219 mm) | 1×6 (¾ × 5½ in / 19 × 140 mm) | Treated pine, cedar or other durable wood. Six boards with ⅜ in (10 mm) gaps make a gate about 35 in (89 cm) wide |
| Rails (ledges) | 2 | 34 in (864 mm) | 2×4 (1½ × 3½ in / 38 × 89 mm) | Same. About 1 in (25 mm) shorter than the gate width, so the ends stay hidden |
| Diagonal brace | 1 | To fit | 2×4 (1½ × 3½ in / 38 × 89 mm) | Same. Cut to fit between the rails, with angled ends that bear tightly on both |
Lengths are for the design in this guide. Measure your own pieces as you build and cut the last ones to fit.
| Item | Qty | Notes |
|---|---|---|
| 1×6 fence boards, at least 48 in (1220 mm) | 6 | |
| 2×4 boards, 8 ft (2.4 m) | 2 | |
| Strap or T-hinges, 12 in (30 cm) or longer | 1 pair | |
| Gate latch | 1 | |
| Exterior screws 2 in (50 mm) | About 40 |
Measure between the posts at the top, middle and bottom, and use the smallest figure. Take off about ½ in (12 mm) for clearance on each side, so a 36 in (91 cm) opening gets a gate of about 35 in (89 cm). Check the posts are plumb; a leaning post has to be fixed first.
Cut the six boards to 48 in (1219 mm), or to the height of your fence, and the two rails to 34 in (864 mm). Lay the boards face down on a flat surface with ⅜ in (10 mm) spacers between them and clamp them together with the ends lined up.
Place the top rail about 6 in (15 cm) below the top of the boards and the bottom rail about 6 in (15 cm) above the bottom, centred so about ½ in (12 mm) of board shows at each end. Check the rails are parallel and square to the boards, then screw through each rail into every board with two 2 in (50 mm) screws.
Mark the hinge side and the latch side on the back of the gate now. The brace must run from the bottom rail on the hinge side up to the top rail on the latch side, so this decision sets which way it slopes.
Lay the second 2×4 diagonally across the rails along that line and mark where it crosses the edges of both rails. Cut the angled ends so the brace fits snugly against the rails without gaps, tap it into place and screw through it into every board it crosses.
Ease sharp edges with sandpaper and paint, stain or oil the gate on all sides, including the end grain at the top and bottom of the boards, where water soaks in first. Let it dry fully before hanging.
Prop the gate in the opening on blocks so it sits about 2 in (50 mm) above the ground, with even gaps at the sides. Screw the hinge straps along the rails and the hinge plates to the post, using long screws that reach well into the post. Check that it swings freely before you take out the blocks.
Fit the latch at a comfortable height on the latch side, following its instructions, and screw a small batten to the latch post or the gate edge as a stop so the gate cannot swing past the post and strain the hinges.
General guidance only. Follow the instructions for your tools and materials and your local rules, and use a qualified professional for electrical, gas and structural work.
A braced gate built like this should open and close smoothly for many years. Check the hinge and latch screws each spring, keep the bottom clear of soil and leaves, and recoat the finish every few years so the boards stay sound.
About this guide: published by Oskar N. and drafted with AI assistance from general, widely used building and gardening practice; see our editorial policy. Text and illustration © DIY Outdoor Builds. Found an error? Let us know.
Share your photos, measurements and what you changed. Your build gets its own page and helps the next person.
What others made, with their own photos and notes.
 Our design
Fences & Gates
 Member project
Raised Garden Beds
 Member project
Raised Garden Beds
 Our design
Raised Garden Beds
From diyoutdoorbuilds.com/guides/wooden-z-brace-garden-gate · DIY Outdoor Builds