 Guide
Workshops & Garages
GuideStep-by-step plan written by our editors, with materials, tools and every step in order.
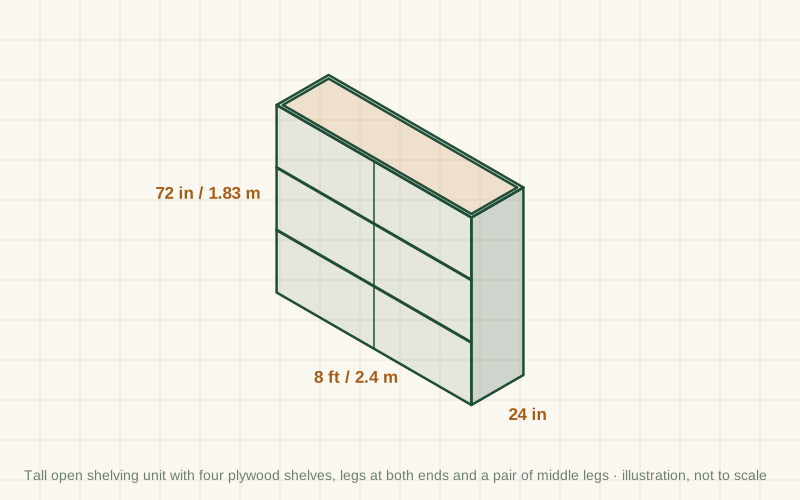
A wall of sturdy shelves is the fastest way to win back a garage floor. This unit is built from ordinary 2×4s and plywood, stands on its own legs and is 24 in (61 cm) deep, which fits the common large storage totes with their lids facing out. It takes about a day with basic tools.
You will build four identical shelf frames from 2×4s, stand them between six legs, and cover each frame with a strip of plywood ripped from a full sheet. The legs sit outside the frames, so the screws carry the load sideways rather than pulling out.
The unit is 8 ft (2.4 m) long because that uses whole boards with almost no waste, and a pair of middle legs halves the span of the long rails. Cross pieces every 24 in (61 cm) stop the plywood from sagging. Finally you screw the top of the unit to the wall studs, so it cannot tip forward when the shelves are loaded.
Build it
Lumber sizes are North American nominal sizes: a 2×4 is actually 1½ × 3½ in (38 × 89 mm). Metric figures in brackets are converted or, for lumber, the nearest common European size (such as 45 × 95 mm), which works the same way.
| Part | Qty | Length | Section | Notes |
|---|---|---|---|---|
| Long shelf rails | 8 | 96 in (2438 mm) | 2×4 (1½ × 3½ in / 38 × 89 mm) | Straight framing lumber. Use whole 8 ft boards; two per shelf |
| Shelf cross pieces | 20 | 21 in (533 mm) | 2×4 (1½ × 3½ in / 38 × 89 mm) | Same. Five per shelf: both ends and every 24 in between; four come from each board |
| Legs | 6 | 72 in (1829 mm) | 2×4 (1½ × 3½ in / 38 × 89 mm) | Same. Two at each end and two in the middle; keep the 24 in offcuts for the cross pieces |
| Shelf tops | 4 | 96 in (2438 mm) | ¾ in (18 mm) plywood, ripped to 23⅞ in (606 mm) wide | Plywood or OSB. Rip each 4 × 8 sheet down the middle to get two shelves |
Lengths are for the design in this guide. Measure your own pieces as you build and cut the last ones to fit.
| Item | Qty | Notes |
|---|---|---|
| 2×4 boards, 8 ft (2.4 m) | 19 (one spare) | |
| ¾ in (18 mm) plywood or OSB, 4 × 8 ft (1220 × 2440 mm) | 2 | |
| Construction screws 3 in (75 mm) | About 150 | |
| Wood screws 1¼ in (32 mm) | About 80 | |
| L-brackets for the wall | 4 |
Clear the wall and measure the space: the unit needs about 8 ft (2.4 m) of wall and 28 in (71 cm) of floor depth, because the legs sit on the outside of the 24 in shelves. Use a stud finder to mark the studs at the top of the wall now, because you will fix the finished unit to at least two of them.
Cut the six legs at 72 in (1829 mm) and the twenty cross pieces at 21 in (533 mm), working from the cut list. Four cross pieces come from one 8 ft board, and the leg offcuts give one more each. Keep the eight long rails at their full 96 in (2438 mm).
For each shelf, lay two long rails on edge, 24 in (61 cm) apart outside to outside, and screw a cross piece flush at each end with two 3 in (75 mm) screws through the rail into the end grain. Add three more cross pieces at 24 in (61 cm) centres. Check that each frame is square by measuring both diagonals.
Mark each plywood sheet down the middle and cut it lengthwise into two strips of about 23⅞ in (606 mm), supported on sawhorses or on scrap boards on the floor so the cut does not pinch. You now have four shelf tops that match the frames.
Lay two legs on the floor and stand the frames between them, with the legs against the outside faces of the long rails at one end. Screw the bottom frame so its underside is about 4 in (10 cm) above the floor, and the top frame flush with the top of the legs, with three screws per leg into each rail. Add the other end legs and the two middle legs, centred on the middle cross piece, the same way.
Measure up from the bottom shelf and fix the two middle frames at even spacing, about 22 in (56 cm) apart, or at heights that fit your totes. Use a level along the front rail before you drive the last screws, then check the whole unit for square and wobble.
Lay a plywood strip on each frame with the factory edge at the front and screw it down with 1¼ in (32 mm) screws every 8–12 in (20–30 cm) into the rails and every cross piece. Screwed tops stiffen the whole unit and stop it racking sideways.
With a helper, lift the unit into place against the wall. Shim the legs if the floor slopes, then screw L-brackets from the top rail into at least two studs, or screw a 2×4 cleat to the studs and the unit to the cleat. Only then start loading it.
General guidance only. Follow the instructions for your tools and materials and your local rules, and use a qualified professional for electrical, gas and structural work.
Once the shelves are up, sort your garage into zones: garden on one side, tools and car things on the other, and label the totes. Check the wall fixings once a year and tighten any screws that have loosened as the wood dries.
About this guide: published by Oskar N. and drafted with AI assistance from general, widely used building and gardening practice; see our editorial policy. Text and illustration © DIY Outdoor Builds. Found an error? Let us know.
Share your photos, measurements and what you changed. Your build gets its own page and helps the next person.
GuideWorkshops & Garages
 Guide
Workshops & Garages
 Guide
Outdoor Furniture
 Guide
Raised Garden Beds
From diyoutdoorbuilds.com/guides/freestanding-2x4-garage-shelves · DIY Outdoor Builds