 Guide
Greenhouses
GuideStep-by-step plan written by our editors, with materials, tools and every step in order.
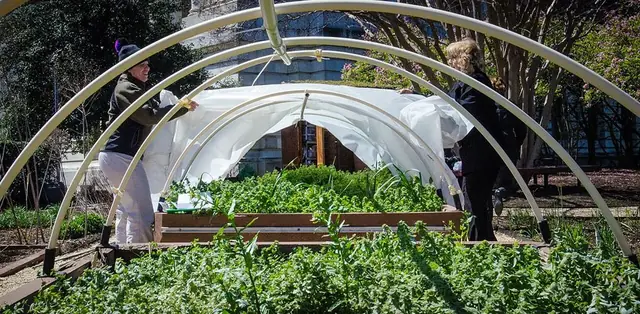
A hoop greenhouse is the cheapest way to get a walk-in growing space. Arches of plastic pipe stand on steel stakes in the ground and carry a sheet of greenhouse film, which warms the soil, keeps off frost and wind, and lets you start seedlings weeks earlier and keep salads going late into autumn.
You will mark a rectangle, drive pairs of rebar stakes along both long sides, slide bent PVC pipes over them to form the hoops, tie the tops together with a ridge pole, fix treated base boards along the bottom, frame the two ends with a door and a vent, and stretch UV-treated greenhouse film over the whole frame.
The example is about 10 × 12 ft (3 × 3.7 m), with five hoops about 3 ft (90 cm) apart. Each hoop is roughly 20 ft (6 m) of pipe, which bends into an arch about 6–7 ft (1.9–2.1 m) high in the middle, enough to stand and work inside. In snowy or windy places, set the hoops closer together.
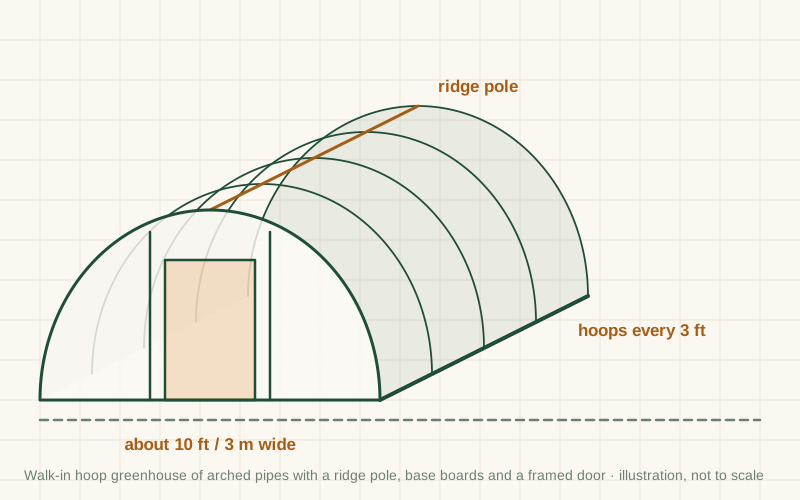
Keep the width at about 10 ft (3 m) for 20 ft (6 m) hoops; a wider tunnel needs longer pipes and comes out lower in the middle. Set hoops about 3 ft (90 cm) apart, or 2 ft (60 cm) where heavy snow or strong wind is common. The length can grow in hoop steps: each extra hoop adds 2–3 ft. Buy film wide enough to cover the arch plus about 2 ft (60 cm) at each side for fixing, and long enough to cover both ends, or buy the end pieces separately. Check local rules first, because larger greenhouses can need permission.
Check your local rules. Greenhouses and polytunnels above a certain size, height or close to a boundary can need permission. Check before you buy materials.
Build it
Lumber sizes are North American nominal sizes: a 2×4 is actually 1½ × 3½ in (38 × 89 mm). Metric figures in brackets are converted or, for lumber, the nearest common European size (such as 45 × 95 mm), which works the same way.
Choose a sunny, sheltered and level spot with good drainage. Mark a rectangle about 10 × 12 ft (3 × 3.7 m) with pegs and string, and measure both diagonals; when they match, the corners are square and the hoops will line up.
Along each long side, drive a piece of rebar every 3 ft (90 cm), directly opposite one on the other side. Drive each one about 18 in (45 cm) into the ground and leave about 6 in (15 cm) standing up, all at the same height.
Join the pipe lengths with couplings if needed. Slide one end of a pipe over a rebar stake, bend the pipe over and slide the other end over the opposite stake. Repeat for every pair, then check that the tops of all the hoops line up at the same height.
Fix a straight pipe along the top of the hoops with cross fittings or clamps, so the hoops cannot lean. Screw pressure-treated 2×6 base boards along the bottom of each long side, fixed to the hoops with pipe straps. They give the film something to attach to.
At each end, stand two 2×4 posts about 3 ft (90 cm) apart for a door frame and fix them to the end hoop and into the ground. Add a header, and frame a hinged door and a vent opening high up in the other end so hot air can escape.
On a calm, mild day, pull the film over the hoops with a helper, centre it, and fix it to the base boards on one side with wiggle wire or battens. Pull it taut from the other side and fix it there, then fold and fix the ends around the door frame.
Cover the door frame with film or polycarbonate and hang it. Make sure the vent can be opened, because a closed hoop house heats up very quickly on a sunny day, even in early spring, and can cook the plants inside.
Lay out beds along both sides with a path down the middle, about 2 ft (60 cm) wide. Water inside the greenhouse yourself, because rain does not reach it, and put a thermometer at plant height so you know when to open the vents.
General guidance only. Follow the instructions for your tools and materials and your local rules, and use a qualified professional for electrical, gas and structural work.
A simple hoop greenhouse can add weeks to both ends of the growing season. Check the film and fixings each autumn before storms, replace the film when it turns cloudy or brittle, and keep the vents working so the plants never overheat.
About this guide: published by Oskar N. and drafted with AI assistance from general, widely used building and gardening practice; see our editorial policy. Text and illustration © DIY Outdoor Builds. Found an error? Let us know.
Share your photos, measurements and what you changed. Your build gets its own page and helps the next person.
What others made, with their own photos and notes.
 Our design
Greenhouses
 Real build
Greenhouses
 Our design
Outdoor Structures
 Real build
Outdoor Structures
From diyoutdoorbuilds.com/guides/pvc-hoop-greenhouse · DIY Outdoor Builds