 Guide
Fences & Gates
GuideStep-by-step plan written by our editors, with materials, tools and every step in order.
A horizontal slat screen gives a patio or seating area privacy without the closed, heavy look of a solid fence. The narrow gaps let light and a little breeze through, and the long lines make a small garden look wider. This guide builds one bay about 6 ft (1.8 m) wide and 6 ft high, with a full cut list. Build several bays in a row for a longer screen.
Two 4×4 posts are set in concrete about 68½ in (1.74 m) apart, centre to centre. A 2×4 rail runs between them at the bottom and another at the top, and a 2×4 stud stands upright in the middle, hidden behind the slats. Seventeen 1×4 cedar slats, each 72 in (1.83 m) long, are screwed across the face of the posts and the stud with ½ in (13 mm) gaps. A 1×6 cap board along the top covers the post tops and the end grain of the top slat.
The middle stud matters more than it looks. A ¾ in (19 mm) slat spanning 6 ft on its own will sag and twist within a season; fixed in the middle as well, it stays straight. The bottom slat sits about 4 in (10 cm) above the ground so it stays out of wet soil and grass trimmers.
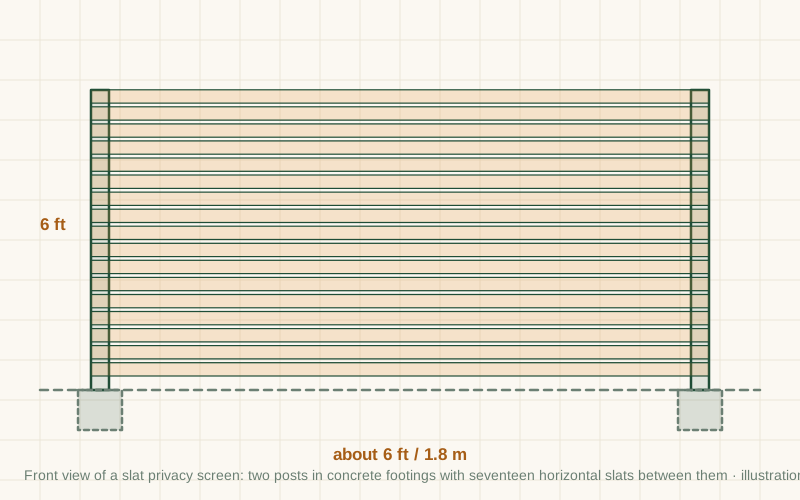
Each bay is designed around 72 in (1.83 m) slats, a common length for cedar boards and half of a 12 ft board. For a different width, keep the gap between post centres 3½ in (89 mm) less than the slat length and keep a support stud at least every 36 in (90 cm). For a lower screen, use fewer slats: each slat plus its gap adds 4 in (10 cm) of height. Above about 6 ft, wind load rises quickly and the posts need deeper footings; check local height limits first.
Check your local rules. Screens and fences are often limited in height, commonly to around 6 ft (1.8 m) in back gardens and lower near a road or a front boundary. Some places treat a screen on the boundary as a fence that needs a neighbour's consent or a permit. Check before you dig, and call your utility locator service so you do not hit buried cables or pipes.
Build it
Lumber sizes are North American nominal sizes: a 2×4 is actually 1½ × 3½ in (38 × 89 mm). Metric figures in brackets are converted or, for lumber, the nearest common European size (such as 45 × 95 mm), which works the same way.
| Part | Qty | Length | Section | Notes |
|---|---|---|---|---|
| Posts | 2 | 96 in (2438 mm) | 4×4 (3½ × 3½ in / 89 × 89 mm) | Pressure-treated, ground contact. 24 in (61 cm) in the ground, 72 in (1.83 m) above |
| Bottom and top rails | 2 | 65 in (1651 mm) | 2×4 (1½ × 3½ in / 38 × 89 mm) | Pressure-treated. Fit between the posts; measure your gap before cutting |
| Middle stud | 1 | 61 in (1549 mm) | 2×4 (1½ × 3½ in / 38 × 89 mm) | Pressure-treated. Stands between the rails at the centre of the bay |
| Slats | 17 | 72 in (1829 mm) | 1×4 (¾ × 3½ in / 19 × 89 mm) | Cedar, larch or other rot-resistant wood. Square both ends; cut all to the same length with a stop block |
| Cap board | 1 | 72 in (1829 mm) | 1×6 (¾ × 5½ in / 19 × 140 mm) | Same as the slats. Laid flat on the post tops |
Lengths are for the design in this guide. Measure your own pieces as you build and cut the last ones to fit.
| Item | Qty | Notes |
|---|---|---|
| 4×4 ground-contact posts, 8 ft (2.4 m) | 2 | Check they are straight before you buy |
| 2×4 pressure-treated boards, 8 ft (2.4 m) | 3 | One rail each from two boards; the stud from the third |
| 1×4 cedar boards, 12 ft (3.6 m) | 9 (or 19 boards of 6 ft) | Each 12 ft board gives two slats; the extra one is a spare |
| 1×6 cedar board, 6 ft (1.8 m) | 1 | For the cap |
| Fast-setting post concrete, 50 lb (23 kg) bags | 4 | About two bags per post in a 10 in (25 cm) hole |
| Exterior screws 1⅝ in (41 mm) | 1 box of about 120 | Stainless near the coast or with cedar, which stains around plain steel |
| Structural screws 3 in (76 mm) | About 16 | For the rails and the stud |
Stretch a string line where the face of the screen will be. Mark the first post centre, then the second exactly 68½ in (1.74 m) along the line. Check the distance twice, because the slats are cut to this spacing and every later step depends on it.
Dig each hole about 10 in (25 cm) across and 28 in (71 cm) deep, put 4 in (10 cm) of gravel in the bottom and stand the post on it. Brace each post with two scrap boards so it is plumb on both faces and its top is 72 in (1.83 m) above the ground. Pour the post concrete as the bag says, slope the top away from the post, and let it set before you go on.
Measure between the posts at the bottom; it should be about 65 in (1.65 m). Cut the bottom rail to that length and fix it between the posts with its underside 4 in (10 cm) above the ground and its face flush with the front of the posts. Drive two 3 in (76 mm) screws at an angle through the rail into each post.
Fix the top rail the same way with its top edge flush with the post tops. Then measure between the rails at the centre of the bay, cut the stud to fit, about 61 in (1.55 m), stand it on edge with its face flush with the posts and screw it to both rails. Check that it is plumb before the last screw.
The first slat sets the line for all the others, so take care. Hold it across the posts and the stud with its underside 4 in (10 cm) above the ground, its ends flush with the outer faces of the posts, and check it with the level. Pre-drill and countersink, then fix it with two screws into each post and two into the stud.
Place the ½ in (13 mm) spacer on top of the fixed slat at each support, lay the next slat on the spacers and screw it the same way. Keep the ends flush with the first slat. Every four or five slats, check the level and measure the height at both posts; correct small drifts by adjusting the gap slightly rather than letting the error grow.
When the seventeenth slat is on, its top edge should be about ½ in (13 mm) below the post tops. Lay the 1×6 cap board flat on the post tops and the top rail, flush with the back of the posts so it overhangs the slats at the front, and screw it down into the posts and the rail.
Sand any splintered ends and break the sharp edges of the cap. Leave cedar to weather to silver grey, or apply an exterior oil or stain while the wood is clean and dry, including the cut ends. Seal the cut tops of the posts if the cap does not cover them fully.
General guidance only. Follow the instructions for your tools and materials and your local rules, and use a qualified professional for electrical, gas and structural work.
More detail
Background for planning and adapting the build: sizes, variations, materials and fixes.
These are the measurements for one bay as built in this guide. The heights are measured from the ground.
| Part | Imperial | Metric |
|---|---|---|
| Post spacing, centre to centre | 68½ in | 1.74 m |
| Post height above ground | 72 in | 1.83 m |
| Post depth in the ground | 24 in plus 4 in gravel | 61 cm plus 10 cm gravel |
| Bottom of the first slat | 4 in | 10 cm |
| Slat width and gap | 3½ in and ½ in | 89 mm and 13 mm |
| Number of slats | 17 | 17 |
| Height covered by slats | 67½ in | 1.71 m |
Each slat plus its gap is 4 in (10 cm), so the number of slats sets the height.
The gap decides how private the screen feels. With ½ in (13 mm) gaps and 3½ in slats, about 12% of the screen is open: from a few steps away you see movement and light but not detail, which suits most patios. A ¼ in (6 mm) gap gives near-complete privacy but looks closer to a solid fence and lets less air through, so the screen catches more wind. A ¾ in (19 mm) gap looks lighter and more modern, but people on the other side can see through it when they stand close.
Whichever gap you choose, keep it the same all the way up. A spacer block does this far better than a tape measure. If you change the gap, recount the slats: the height covered is the number of slats times the slat width plus the number of gaps times the gap.
Cedar and larch are the usual choices for the slats because they are light, stable and resist rot without treatment. Both weather to silver grey if left untreated. Thermally modified pine or spruce is a good alternative where cedar is expensive; it is very stable but brittle, so pre-drill every screw. Pressure-treated pine works and is cheaper, but it moves more as it dries and needs a finish to look good.
The posts carry the load and sit in wet ground, so use pressure-treated wood rated for ground contact (often labelled UC4 in Europe) whatever you choose for the slats. For a darker, modern look, oil the cedar with a tinted exterior oil or paint the whole screen black or charcoal; dark colours hide gaps and make the slats read as stripes.
Setting posts in concrete is the strongest option and suits a screen standing on soil. In heavy clay or where the ground freezes deeply, go deeper rather than wider, and put gravel under the post so water can drain away from the end grain.
On an existing patio or deck you cannot dig, so the posts stand on bolt-down post anchors instead. These hold a screen about 4 ft (1.2 m) high well, but a full 6 ft screen catches a lot of wind, and the anchors and the slab or deck frame under them must be strong enough. Lower the screen, add a third post per bay, or tie the end post to a wall or another structure if you use anchors for a tall screen.
For two or more bays, set all the posts on one string line before fixing any slats. Each extra bay needs one more post, two rails, a stud and seventeen slats. Shared posts carry slats from both sides, so on the shared post each slat end covers only half the post face; use 1⅝ in screws placed at least ¾ in (19 mm) from the slat ends, and pre-drill. Alternatively, let alternate rows run past the post into the next bay with longer boards, which hides the joints and stiffens the screen.
Check the screen after the first winter and tighten any screws that have backed out as the wood dried. Clear leaves and soil from the bottom slat every autumn. Untreated cedar needs nothing more than an occasional wash; oiled or stained wood looks best with a new coat every two or three years, applied on a dry day after brushing off dirt and moss.
For ¾ in (19 mm) slats, keep supports no more than about 36 in (90 cm) apart. This design puts the posts 68½ in (1.74 m) apart with a stud in the middle, which gives supports roughly every 34 in.
Between ¼ and ¾ in (6 and 19 mm). Half an inch (13 mm) is a good middle: private from a few steps away, with some light and air through. Use a spacer block to keep it even.
About one third of the post length, so 24 in (61 cm) for a post with 72 in above ground, plus a layer of gravel. Go deeper in soft ground, in very windy places and where frost goes deep.
Yes, with bolt-down post anchors, but a full-height screen catches a lot of wind. Keep it lower, add posts, or tie it to a solid structure, and fix the anchors into something strong enough to hold them.
On the side you look at most, usually the patio side, so the posts and the middle stud are hidden behind the slats. If both sides matter, clad both faces with the slats staggered, which also makes the screen more private.
It depends on where you live. Many places allow screens up to about 6 ft (1.8 m) in back gardens without a permit, but lower limits often apply near roads and on front boundaries. Check local rules before you build.
Once the first bay is up, the second goes much faster: the post spacing, the stud and the spacer routine are the same. Give the concrete a full day before you hang anything heavy on the screen, and check the screws after the first winter, when the wood has settled. A climbing plant or a planter in front of the screen softens it within a season.
About this guide: published by Oskar N. and drafted with AI assistance from general, widely used building and gardening practice; see our editorial policy. Text and illustration © DIY Outdoor Builds. Found an error? Let us know.
Share your photos, measurements and what you changed. Your build gets its own page and helps the next person.
What others made, with their own photos and notes.
 Our design
Fences & Gates
 Member project
Raised Garden Beds
 Member project
Raised Garden Beds
 Our design
Raised Garden Beds
From diyoutdoorbuilds.com/guides/modern-horizontal-slat-privacy-screen · DIY Outdoor Builds