 Guide
Compost Bins
GuideStep-by-step plan written by our editors, with materials, tools and every step in order.
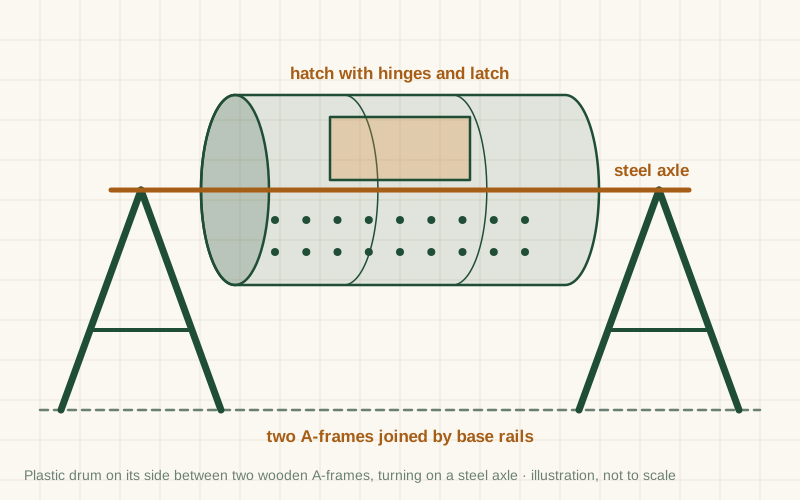
A compost tumbler keeps kitchen and garden scraps in a closed drum that you turn with one hand, so mixing in air takes seconds instead of a session with a fork. This one is made from a reused food-grade plastic barrel that turns on a steel axle between two simple 2×4 A-frames.
You will cut a hatch in the side of the drum, drill air holes, push a steel axle through the centre of both ends, and build a stand that holds the axle at a comfortable height. The drum turns around the axle, and a latch keeps the hatch shut while it rolls.
A tumbler works best in batches: fill it half to two-thirds full with a mix of green and brown material, turn it often, and stop adding new scraps while that batch finishes. Many gardeners build two drums, or use a tumbler next to an ordinary compost bin, so there is always somewhere to put fresh scraps.
Build it
Lumber sizes are North American nominal sizes: a 2×4 is actually 1½ × 3½ in (38 × 89 mm). Metric figures in brackets are converted or, for lumber, the nearest common European size (such as 45 × 95 mm), which works the same way.
| Part | Qty | Length | Section | Notes |
|---|---|---|---|---|
| A-frame legs | 4 | 34 in (864 mm) | 2×4 (1½ × 3½ in / 38 × 89 mm) | Treated or durable timber. Two per A-frame, crossing at the top where the axle hole goes |
| A-frame cross braces | 2 | 28 in (711 mm) | 2×4 (1½ × 3½ in / 38 × 89 mm) | Same. Trim the ends to fit once the legs are spread |
| Base rails | 2 | 42 in (1067 mm) | 2×4 (1½ × 3½ in / 38 × 89 mm) | Same. Join the feet of the two A-frames; adjust to your drum length plus about 7 in |
Lengths are for the design in this guide. Measure your own pieces as you build and cut the last ones to fit.
| Item | Qty | Notes |
|---|---|---|
| Food-grade plastic drum, about 55 gal (208 L) | 1 | |
| Steel pipe or rod, about 1 in (25 mm) × 48 in (1220 mm) | 1 | |
| 2×4 boards, 8 ft (2.4 m), treated or durable | 3 | |
| Strap hinges, plus a hasp or latch, with bolts and nuts | 2 + 1 | |
| Hose clamps or pipe collars | 2 |
Use a drum that held food products such as syrup, juice or olives, never oils, solvents or chemicals of any kind. Rinse it out well with water and a little dish soap, and let it dry. Measure its length and diameter before you cut the stand parts.
Mark a rectangle of about 12 × 10 in (30 × 25 cm) on the side of the drum, halfway along its length. Drill a starter hole in one corner and cut it out with a jigsaw, going slowly so the plastic does not crack. Keep the cut-out piece, because it becomes the door.
Bolt the two strap hinges along one long edge of the hatch and the drum, with washers on the inside so the bolts cannot pull through. Fit the hasp or latch on the opposite edge. A strip of weatherstrip around the opening helps keep rain out and moisture in.
Drill about 20 to 30 holes of ¼–½ in (6–12 mm) in rows around the drum, roughly 6–8 in (15–20 cm) apart. Use fewer holes in a dry climate and more in a wet one. Very large holes let fine compost fall out, so keep them modest.
Find the exact centre of each end of the drum; molded seams and the bung rim help. Measure the actual outside diameter of your pipe or rod and drill a hole just slightly larger through both ends. Slide the axle through to check it runs straight before going on.
Cross two legs at the top and screw them together, then drill an axle hole through the crossing point at the same size as before. Spread the feet so the axle sits about 30–32 in (76–81 cm) off the ground and screw a cross brace across the legs about a third of the way up.
Stand the A-frames apart by the drum length plus a little room, screw the base rails across their feet, and push the axle through one frame, the drum and the other frame. Fit a hose clamp or collar on each end of the axle so it cannot slide out, then spin the drum to check it turns freely.
Fill the drum half to two-thirds full with a mix of greens (kitchen scraps, fresh clippings) and browns (dry leaves, shredded cardboard, straw), roughly two to three parts brown to one part green by volume. Turn it once a day or every few days. When the batch is dark and crumbly, open the hatch, roll the drum hatch-down over a wheelbarrow and empty it.
General guidance only. Follow the instructions for your tools and materials and your local rules, and use a qualified professional for electrical, gas and structural work.
With regular turning and a good mix of greens and browns, a tumbler batch can be ready in a few weeks in warm weather and a few months in cool weather. Screen out any lumps, toss them into the next batch, and spread the finished compost on your beds.
About this guide: published by Oskar N. and drafted with AI assistance from general, widely used building and gardening practice; see our editorial policy. Text and illustration © DIY Outdoor Builds. Found an error? Let us know.
Share your photos, measurements and what you changed. Your build gets its own page and helps the next person.
What others made, with their own photos and notes.
 Our design
Compost Bins
 Real build
Compost Bins
 Real build
Compost Bins
 Member project
Raised Garden Beds
From diyoutdoorbuilds.com/guides/barrel-compost-tumbler-on-a-stand · DIY Outdoor Builds